電控玻璃特點與優勢
Features & Advantages
- 白色或深灰色不透明屏障,輕觸開關後即可轉為透明狀態
- 結合建築師 / 設計師 / 承包商的創造性設計理念,工程靈活度高
- 可製成圓弧、異形或穿孔造型,滿足客製化需求
- 靈活的尺寸 — 最大 1,500 mm × 3,500 mm
- 可設計單層或複層玻璃結構
- 可用在特殊形狀(圓形、三角形、多邊形)玻璃窗上
- 高對比背投螢幕的絕佳解決方案
- 可阻擋 99% 的紫外線
- 低工作電壓,每平方米消耗不到 5W
- 謹慎使用時有 25 年的平均使用壽命
- White or dark grey opaque barrier — switches to transparent at the flick of a switch
- Highly flexible — works with creative design ideas from architects, designers, and contractors
- Can be cut into curves, irregular shapes, or with perforations for customised needs
- Flexible sizing — up to 1,500 mm × 3,500 mm
- Available as single-pane or double-glazed structures
- Works on special shapes (circles, triangles, polygons)
- Excellent solution for high-contrast rear-projection screens
- Blocks up to 99% of UV radiation
- Low operating voltage — under 5 W per square metre
- Average service life of 25 years with proper use
技術原理
How It Works
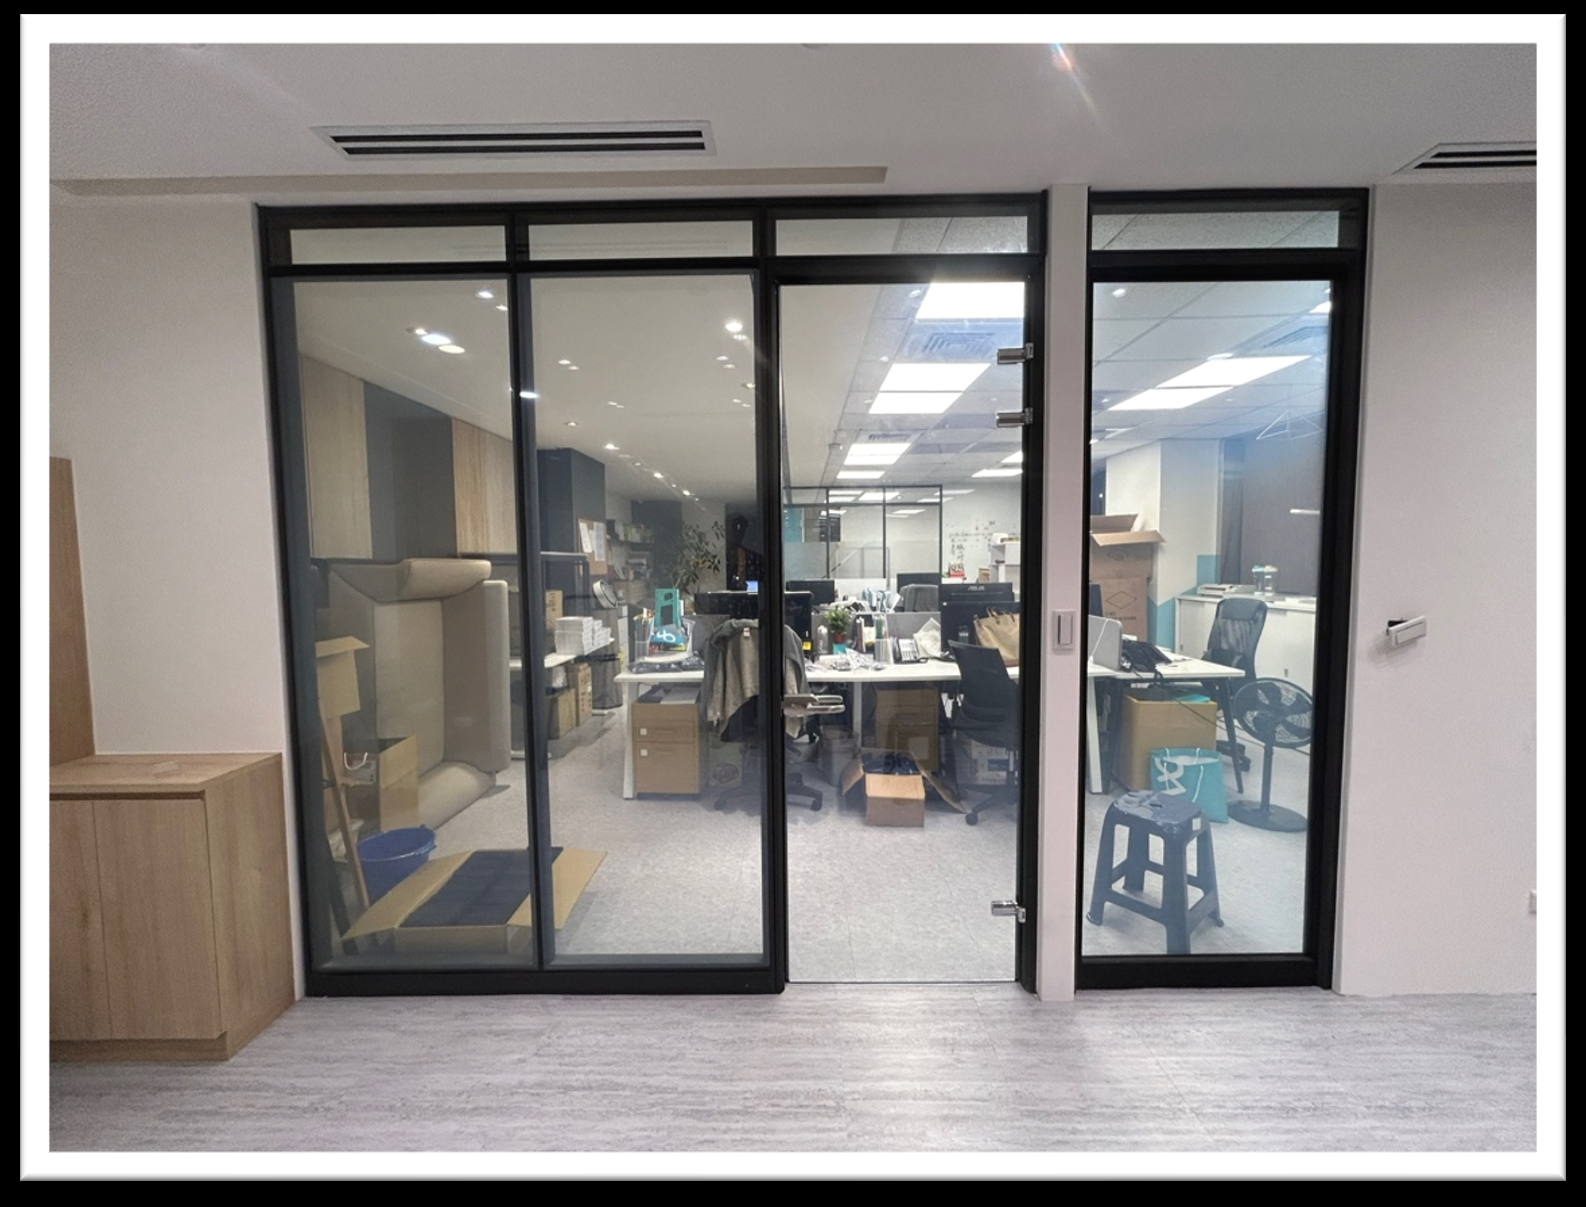
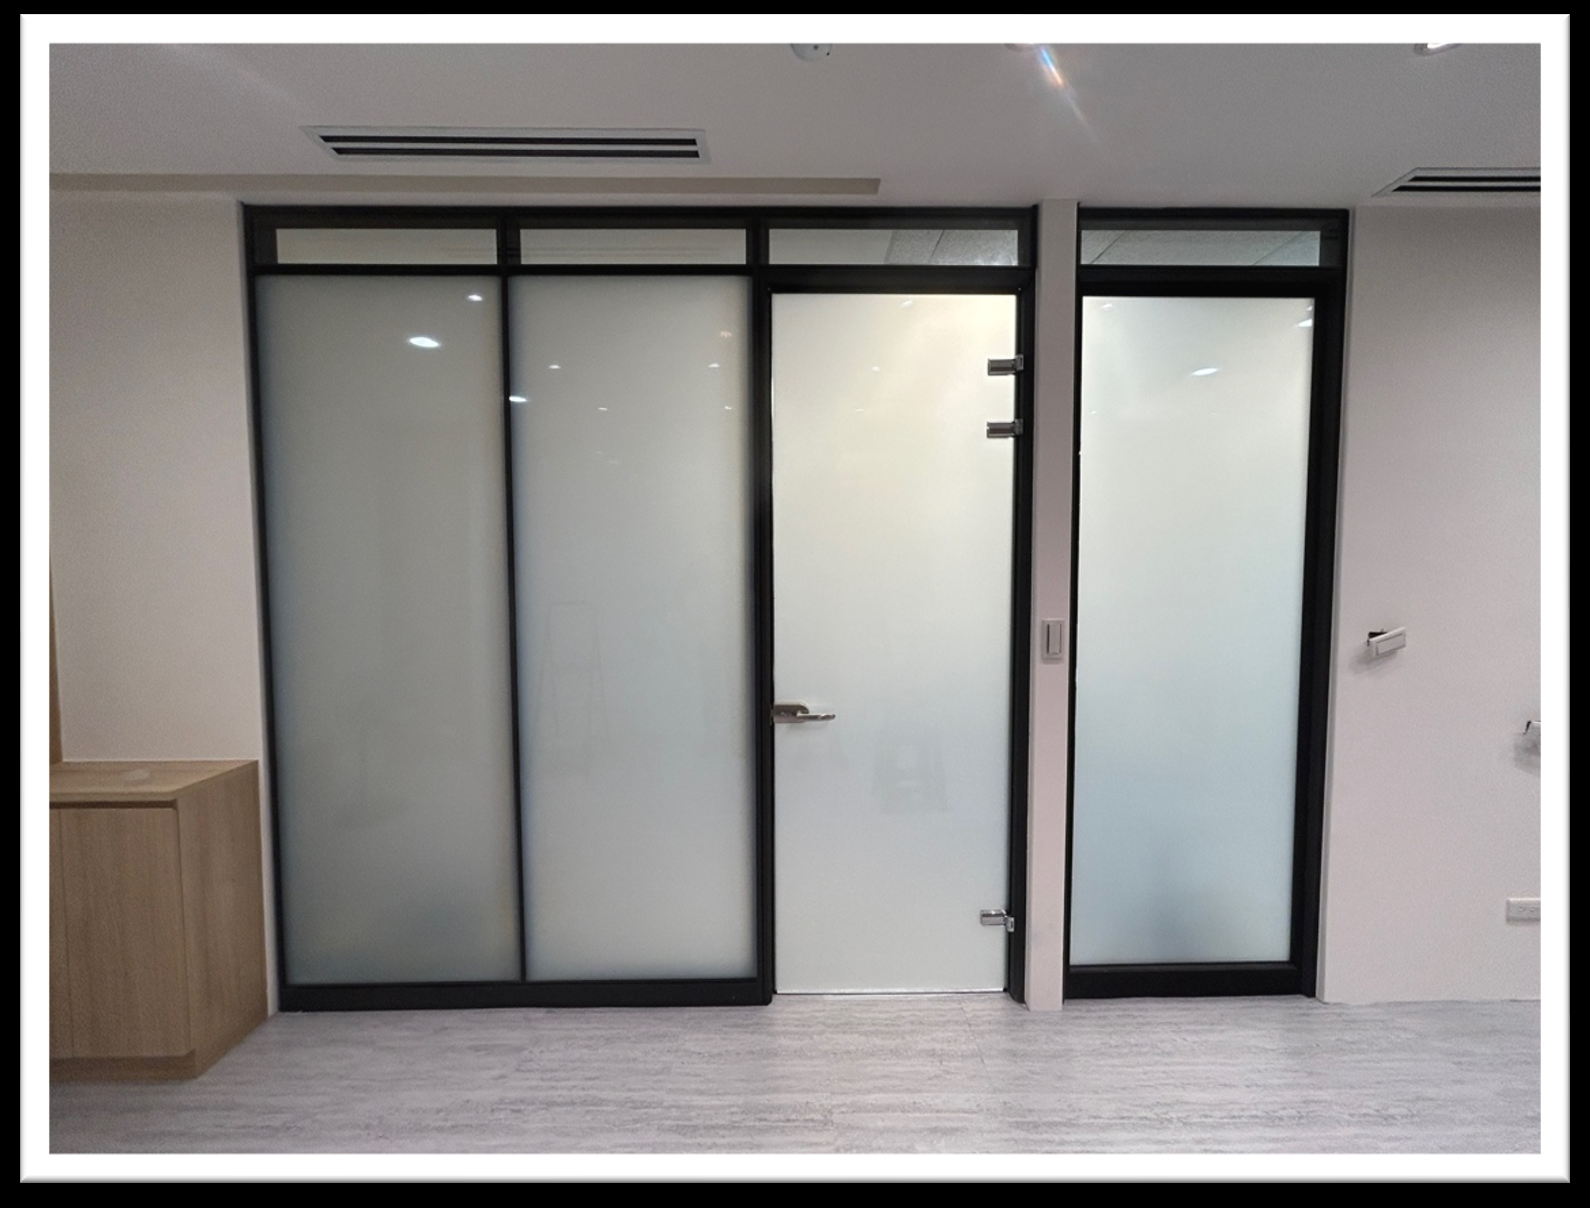
電源關閉時,液晶分子隨機排列,阻擋光源 → 電控玻璃呈現不透明。
電源開啟後,液晶分子排列有序,光線得以通過 → 電控玻璃變得透明。
When power is off, the liquid-crystal molecules align randomly, blocking light → the glass appears opaque.
When power is on, the molecules line up in an orderly fashion, allowing light to pass → the glass becomes transparent.
技術規格
Technical Specifications
| 玻璃顏色 | 可與彩色膜或各種有色玻璃結合,以滿足各種客製化需求 |
|---|---|
| 厚度 | 8.6 mm、10.6 mm、11.2 mm,及複層結構 |
| 尺寸 |
STARTEK 1 系列:最大 4,500 mm × 2,000 mm 明基(BenQ)系列(PDLC 95 / 97 / 98):最大 1,500 mm × 3,000 mm 註:兩條產品線最大尺寸不同,設計分割時請依實際使用之系列確認上限。明基系列另有上游材料技術操作手冊(工作電壓 48 VAC、矽利康指定品牌、貼膜流程等),由 STARTEK 內部工程團隊執行,本文件不涵蓋。
|
| 形狀 | 任何形狀或彎曲,包括開孔 |
| 環境 | 儲存:-15°C 至 60°C / 工作溫度:-20°C 至 60°C |
| 電氣 | 驅動電壓 65 VAC(提供變壓器)/ 電流 200 mA / m² / 功率 5 W / m² |
| 切換時間 | 室溫下約 < 10 ms |
| 光學 | 可見光透射率:約 75% ~ 80%(開啟狀態)/ 可視角 > 140° |
| 壽命 | 依據本規格書儲存與安裝、正確使用:室內 25 年 |
| Glass Colour | Can be combined with colour films or tinted glass for various custom requirements |
|---|---|
| Thickness | 8.6 mm, 10.6 mm, 11.2 mm, and laminated/insulated structures |
| Size |
STARTEK 1 Series: up to 4,500 mm × 2,000 mm BenQ Series (PDLC 95 / 97 / 98): up to 1,500 mm × 3,000 mm Note: Maximum sizes differ between the two product lines. Confirm against the actual series used when planning panel divisions. The BenQ series has a separate upstream technical handbook (48 VAC operating voltage, specified silicone brands, lamination process) executed by STARTEK's internal engineering team and not covered here.
|
| Shape | Any shape or curve, including cutouts |
| Environment | Storage: −15°C to 60°C / Operating: −20°C to 60°C |
| Electrical | Drive voltage 65 VAC (transformer included) / Current 200 mA/m² / Power 5 W/m² |
| Switching Time | ≈ < 10 ms at room temperature |
| Optical | Visible light transmittance ≈ 75–80% (ON state) / Viewing angle > 140° |
| Lifespan | 25 years indoors when stored, installed, and used according to this specification |
使用須知
Usage Notes
- STARTEK 提供基本 5 年或延長最長 10 年(依報價規定)的保固計畫。
- 為了維持壽命,建議使用上 24 小時內至少 4 ~ 5 小時處於「關閉」狀態,且一次不得連續「打開」超過 20 小時。
- 電控玻璃在光學上不如一般玻璃透明,由於物質不滅律會出現一定程度的霧狀,不應視為品質問題而要求更換或退款。
- STARTEK offers a standard 5-year warranty, extendable up to 10 years (per quotation terms).
- To preserve lifespan, the glass should be OFF for at least 4–5 hours within any 24-hour period, and should not be kept continuously ON for more than 20 hours at a stretch.
- Smart glass is not optically as clear as ordinary glass. Due to its functional materials, a slight haze is inherent in the ON state and does not constitute grounds for replacement or refund.
尺寸公差(合約條款)
Dimensional Tolerance (Contract Terms)
- 電控液晶導電膜尺寸會比玻璃長寬 -2 ~ 5 mm,電極區約 15 mm 內,並會在膜邊使用收邊材料或防水膠以確保使用年限。
- 依據現場實際狀況,玻璃長寬可容許正負 3 公分標準差,此不為退/換貨之理由。
- 本產品依照 CNS-1183 膠合玻璃進行驗收尺寸、外觀等標準(玻璃含有氣泡、雜質應在 CNS-2441、2442、3288 所規定容許數之合計值以下)。
- The PDLC film is 2–5 mm smaller in both length and width than the glass, with an electrode area of up to ~15 mm, and edge-sealing material or waterproof adhesive is applied at the film edge to protect service life.
- Depending on site conditions, glass length and width may vary by ±3 cm, which does not constitute grounds for return or exchange.
- This product is inspected for size and appearance per CNS-1183 (laminated glass). Bubbles and impurities are accepted within the limits of CNS-2441, 2442, and 3288.
電控玻璃形狀(可加工、鑽孔)
Shapes & Cutouts
電控玻璃支援各種幾何形狀加工與鑽孔,含矩形、圓形、三角形、梯形、平行四邊形、圓弧頂、缺口、開孔、切口、特殊形狀。
Smart glass supports a wide range of geometric shapes and drilling — including rectangles, squares, triangles, trapezoids, parallelograms, domed tops, notches, holes, cut-outs, and special shapes.
電控玻璃形式
Product Types
STARTEK 提供三種型式以對應不同空間情境:直貼式(SQUID)、膠合式(OYSTER)、複層式(JELLYFISH)。
STARTEK offers three product types matched to different spatial scenarios: self-adhesive (SQUID), laminated (OYSTER), and insulated double-glazed (JELLYFISH).
直貼式
- 厚度 8 mm、10 mm
- 整合優白強化玻璃
- 現場施工
膠合式
- 厚度 10 mm、12 mm
- 雙層特殊超透膠合膜 + EVA 中間膜
- 整合優白強化玻璃
複層式
- 厚度 8+12+8、8+12+10(膠合)
- 整合 LOW-E 玻璃,可選用鍍膜
- 內含乾燥空氣層 + 乾燥劑
Self-Adhesive
- Thickness 8 mm, 10 mm
- Integrated with low-iron tempered glass
- On-site installation
Laminated
- Thickness 10 mm, 12 mm
- Dual-layer ultra-clear laminate + EVA interlayer
- Integrated with low-iron tempered glass
Insulated (IGU)
- Thickness 8+12+8, 8+12+10 (laminated)
- Integrated with LOW-E glass; coating options available
- Internal dry-air cavity + desiccant
產品形式參考圖
Product Type Reference


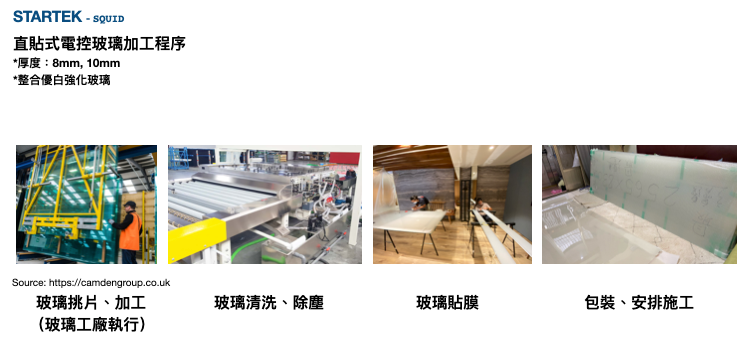
SQUID 直貼式加工程序
SQUID Self-Adhesive — Fabrication Process
玻璃挑片 / 加工(玻璃工廠執行)→ 玻璃清洗、除塵 → 玻璃貼膜 → 包裝、安排施工
Glass selection & processing (at the glass factory) → cleaning & dust removal → film application → packaging & installation scheduling
產品比較表
Product Comparison
| 項目 | SQUID 直貼式 | OYSTER 膠合式 | JELLYFISH 複層式 |
|---|---|---|---|
| 既有玻璃可施作 | △ 須先確認玻璃平整度、施作環境 | ✗ | ✗ |
| 電線佈線 | 依現場狀況,適用合適收邊條 | 可藏在框內 | △ 可藏在框內 |
| 局部施作 | ○ | ✗ | 不一定,視不同組合決定 |
| 潮濕處使用 | ✗ | ○ | ○ |
| 接縫 | 接縫約 5–7 mm,會透光 | 無框施作(絕對玻對玻)須加修飾條收邊 1.5 cm | 無框施作(絕對玻對玻)須加修飾條收邊 2 cm |
| 隔熱 / 節能 | ✗ | ✗ | ○ |
| 隔音 | ○ | ○ | ○ |
| Item | SQUID Self-Adhesive | OYSTER Laminated | JELLYFISH Insulated |
|---|---|---|---|
| Application on existing glass | △ Check flatness & site conditions first | ✗ | ✗ |
| Wiring | Depends on site; concealed via edge trim | Concealed inside frame | △ Concealed inside frame |
| Partial application | ○ | ✗ | Depends on configuration |
| Use in wet areas | ✗ | ○ | ○ |
| Seam | 5–7 mm seam, light leaks through | Frameless install (glass-to-glass) needs 1.5 cm trim | Frameless install (glass-to-glass) needs 2 cm trim |
| Thermal insulation / energy saving | ✗ | ✗ | ○ |
| Acoustic insulation | ○ | ○ | ○ |
電控玻璃安裝
Installation
基本條件
Site Prerequisites
- 確認現場及工作區域條件,所有不利情況皆以調整後,才開始進行施工。
- 準備好電控玻璃後,需確認運送通道暢通,沒有可能影響工作的障礙物。
- 去除安裝場域可能影響矽利康收尾的污染或阻礙物。
- 上矽利康之前,確認已將電控玻璃表面做基礎清潔,並使用明星電控建議品牌矽利康。
- Confirm site and work-area conditions. Resolve all unfavourable conditions before starting work.
- Once the glass is on site, ensure the delivery path is clear and free of obstacles.
- Remove any contamination or obstruction that could affect silicone sealing.
- Before applying silicone, perform a basic surface clean of the glass and use only STARTEK-recommended silicone brands.
安裝
Installation
- 開始安裝之前,先檢查每一塊電控玻璃。
- 不要安裝尺寸不合適、邊緣受損或已經有明顯刮傷、磨損或其他缺陷的產品。
- 在案場負責人驗收前,不要從電控玻璃上移除明星電控提供之標示標籤。
- 遵守所有安裝說明以及現場施工圖規範。
- 以施工圖面規劃固定電控玻璃。
- 電控玻璃之間接縫必須符合明星電控相關規範與標準。
- 當電控玻璃需要安裝在可移動的框架中(如移動窗或滑門),須明確事前指定。
- 電控玻璃在戶外或潮濕的儲放空間中,必須進行包覆,避免直接淋水浸濕。
- 電控玻璃安裝位置須考量電線連接,以便後續接電安裝。
- 在潮濕環境中,電線連接必須要在頂部保持乾燥且絕緣條件下密封。
- Inspect every panel before installing.
- Do not install panels with wrong dimensions, damaged edges, or visible scratches, abrasions, or other defects.
- Do not remove STARTEK's identification labels until the site manager has accepted the work.
- Follow all installation instructions and site shop-drawings.
- Fix the glass according to the shop-drawings.
- Seams between panels must comply with STARTEK's specifications and standards.
- If the glass needs to be installed in a movable frame (e.g. sliding window or door), this must be specified in advance.
- If stored outdoors or in damp areas, the glass must be wrapped to prevent direct water exposure.
- Installation location must allow for subsequent electrical connection.
- In damp environments, electrical connections must be sealed at the top under dry, insulated conditions.
保護
Protection
安裝後需至少 24 小時固定,不可隨意觸碰或將其他物體、焊接火花等容易破壞電控玻璃表面材料直接使用。
After installation, allow at least 24 hours for the fixings to cure. Avoid contact with objects, welding sparks, or anything that could damage the glass surface.
清潔
Cleaning
使用潔淨乾布搭配酒精,或其他明星電控推薦之清潔用品噴灑電控玻璃表面清潔即可。
Use a clean dry cloth with alcohol, or other STARTEK-recommended cleaning products sprayed onto the surface.
框架設計/佈線規劃
Frame Design & Wiring Planning
參考明星電控規劃之規範。
Refer to STARTEK's planning specifications.
核心觀念 — 電控玻璃要藏電線
Core Principle — Conceal the Wires
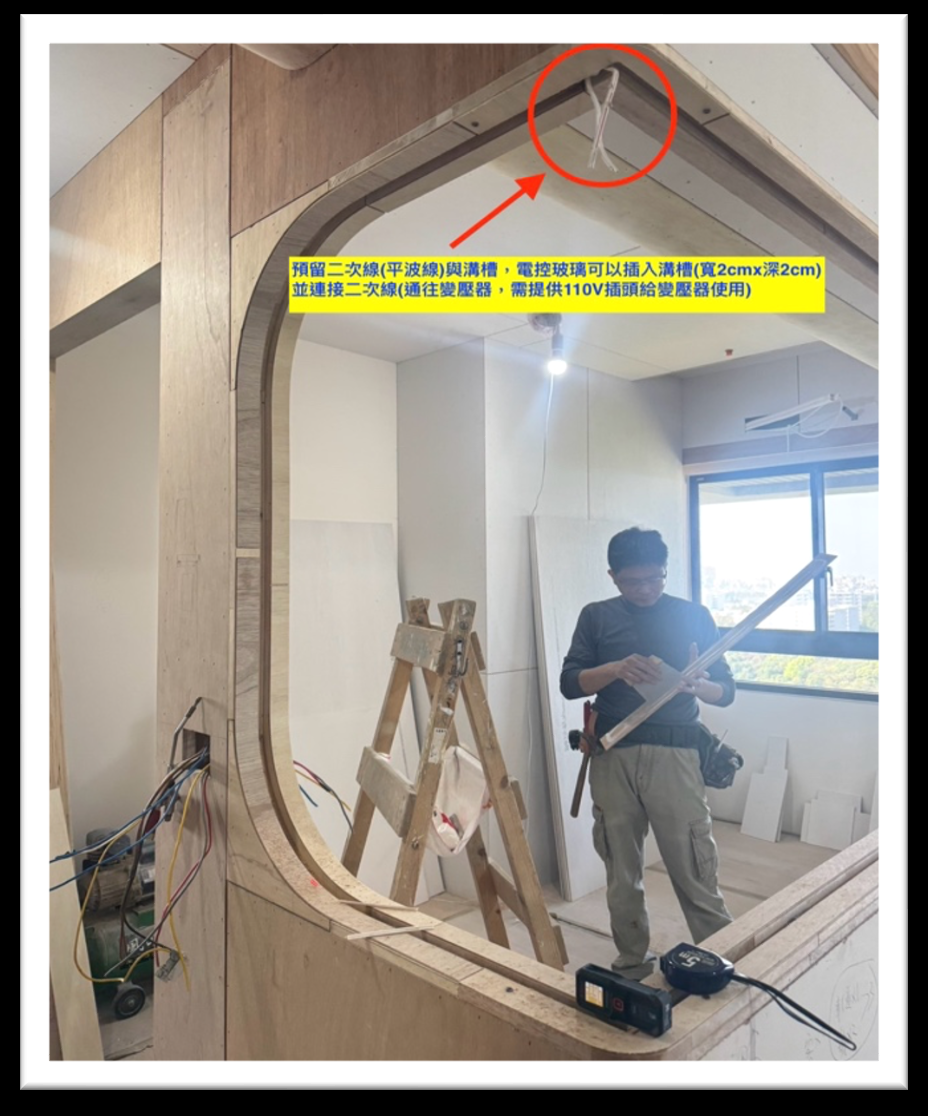
很多設計師第一次接觸電控玻璃時,會以為它「就是一片玻璃」 — 其實不是。電控玻璃有電極、要接電、需要變壓器,圖面上必須像規劃線型 LED 燈具一樣,預留溝槽、二次線、變壓器、110V 插座。
Many designers approach smart glass as if it were "just a sheet of glass" — it isn't. Smart glass has electrodes, needs power, and requires a transformer. Treat it like a linear LED fixture in your drawings — reserve grooves, run secondary wiring, plan transformer locations, and provide a 110V outlet.
- 電極要隱藏在窗框溝槽裡 — 玻璃上下緣(或側緣)有 6 mm 寬電極區,必須藏入窗框溝槽,否則暴露在外不美觀。
- 窗框要預留出線孔給二次線 — 二次線(不帶電的平波線)從電極連出,須穿過窗框上的開孔走到變壓器;現場需有 110V 插座供變壓器使用。
- Conceal the electrode inside the frame groove — there is a 6 mm-wide electrode strip along the top/bottom (or side) edges; this must be hidden inside the frame groove, otherwise it will be visible.
- Reserve an exit hole for the secondary wiring — the secondary wire (a non-powered ribbon cable) runs from the electrode through a hole in the frame and out to the transformer. A 110V outlet for the transformer is also required on site.
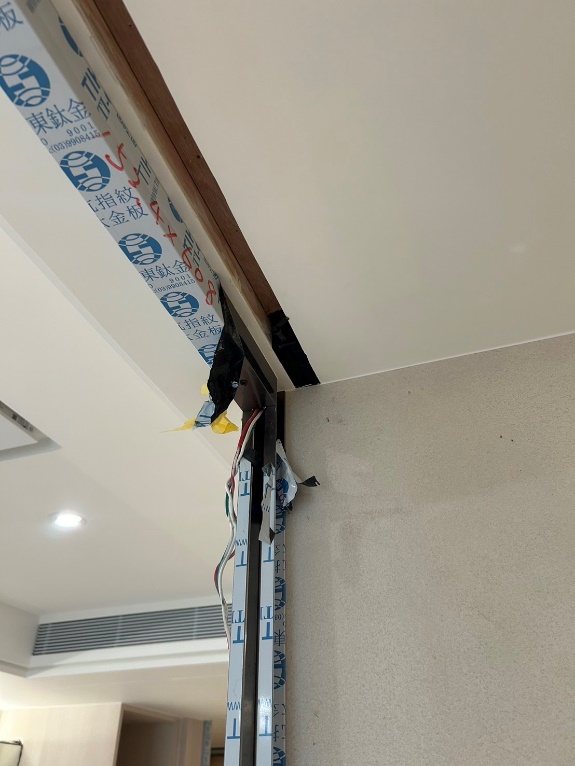
窗框立面 — 出線孔位置
Frame Elevation — Wire Exit Holes
兩種電控玻璃結構(橫切面)
Two Glass Structures (Cross-Section)
電控玻璃有兩種做法,液晶膜的位置不同,但施工邏輯(電極藏溝槽 + 二次線拉出)相同。
There are two construction methods. The film sits in a different place, but the installation logic — concealed electrode + secondary wiring — is the same.
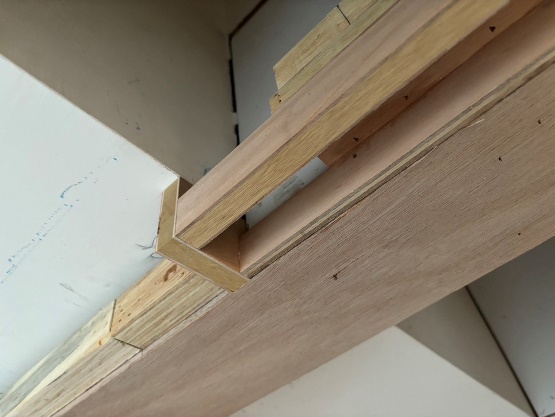
窗框溝槽與電極/二次線(剖面概念)
Frame Groove + Electrode + Secondary Wire (Section)
無論膠合式或直貼式,玻璃上緣(或下緣)的電極都必須藏入窗框溝槽,二次線從電極延伸後穿過窗框出線孔走到變壓器。
Whether laminated or self-adhesive, the electrode along the top (or bottom) edge of the glass must be hidden inside the frame groove. The secondary wire then runs from the electrode through the frame's exit hole and out to the transformer.
- 天花板內部空間放置變壓器(STARTEK 110×46×179 mm 或明基 AWS100 69×242×44 mm)
- 110V 插座於天花板內供變壓器使用
- 窗框上緣出線孔讓二次線從電極鑽入天花板
- Ceiling-cavity space for the transformer (STARTEK 110×46×179 mm or BenQ AWS100 69×242×44 mm)
- 110V outlet inside the ceiling cavity to feed the transformer
- Wire exit hole at the top of the frame for the secondary wire to route into the ceiling
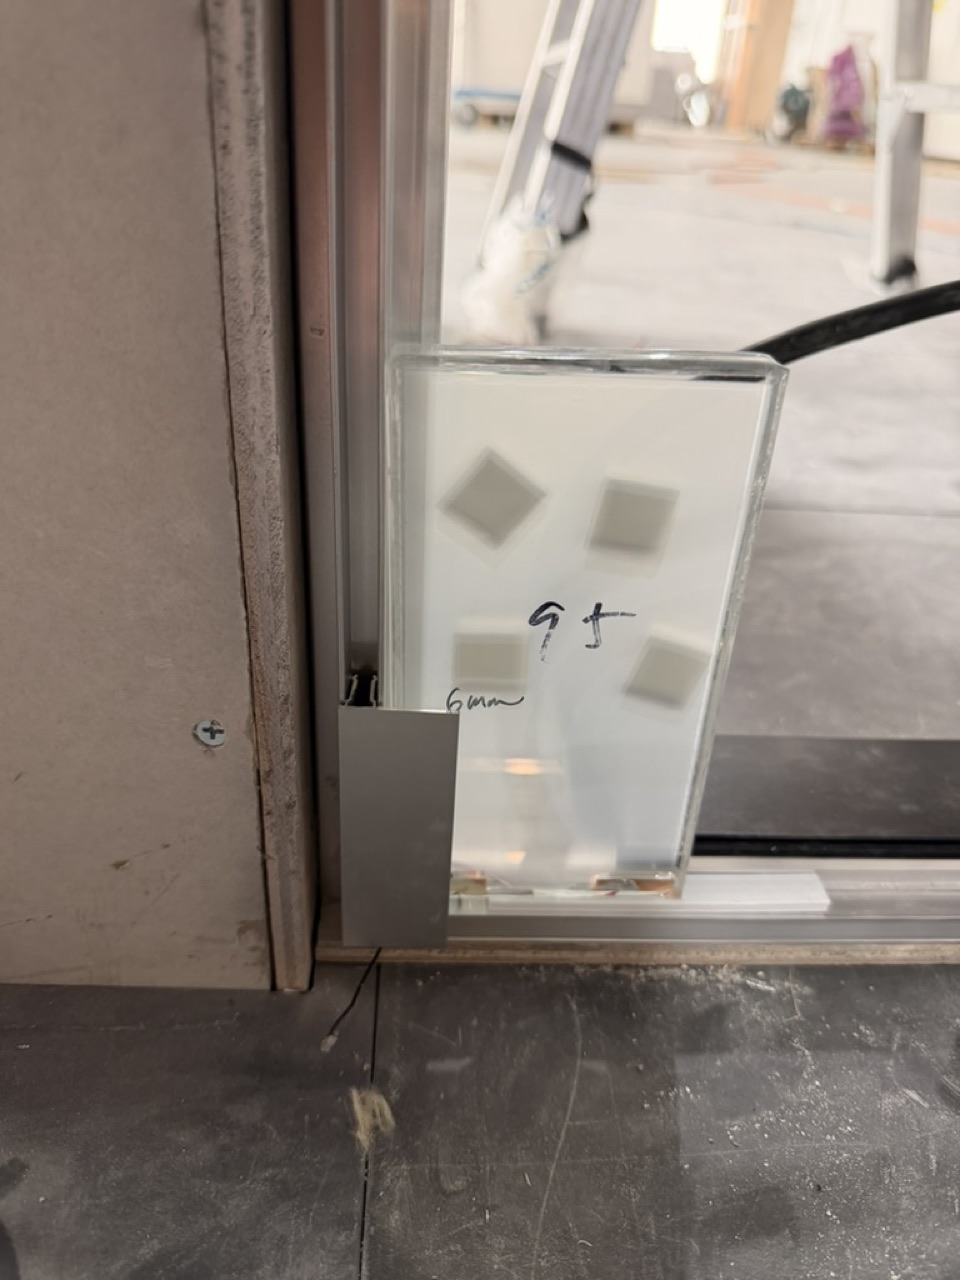
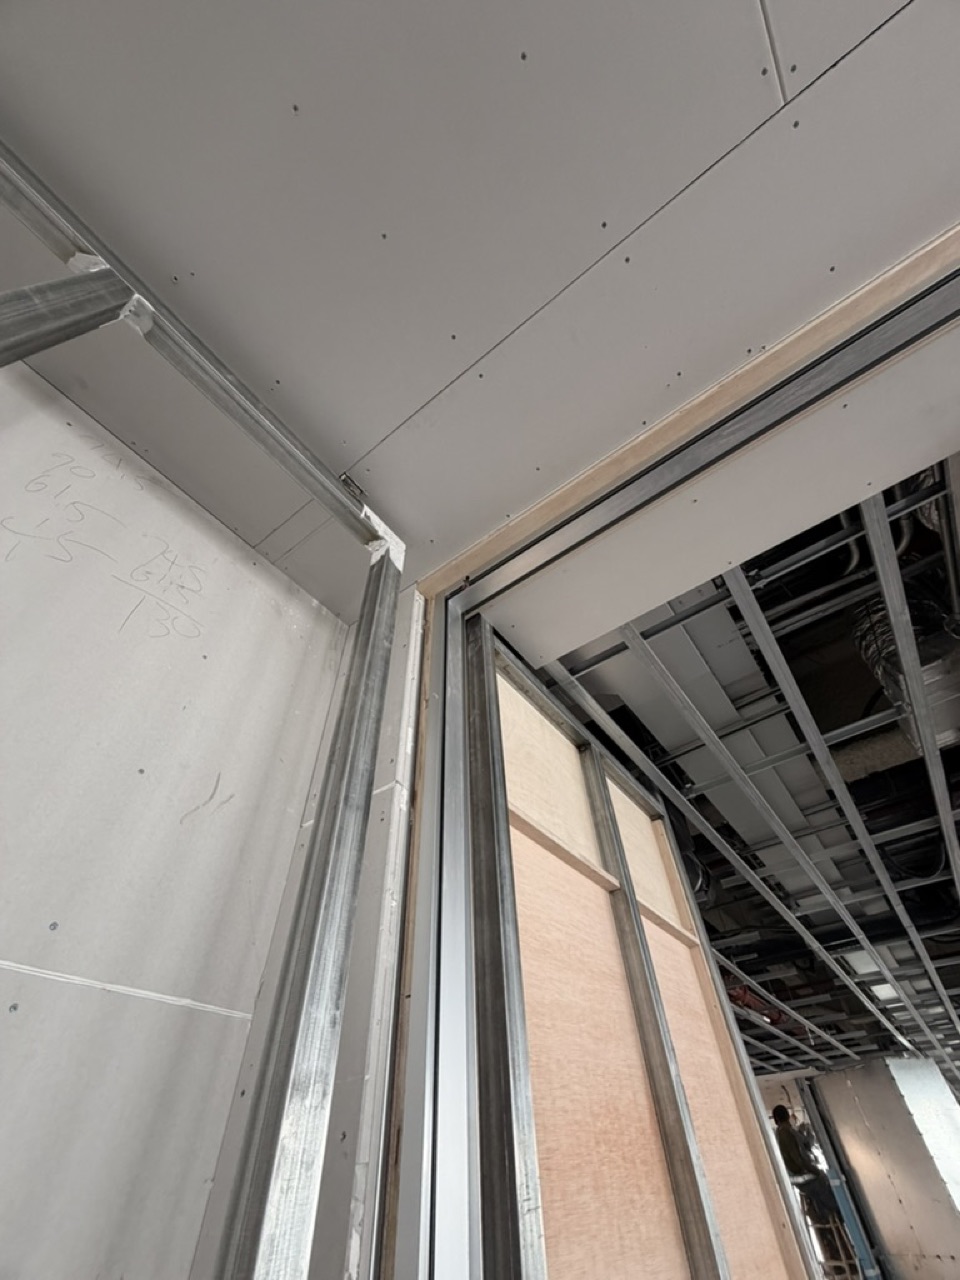
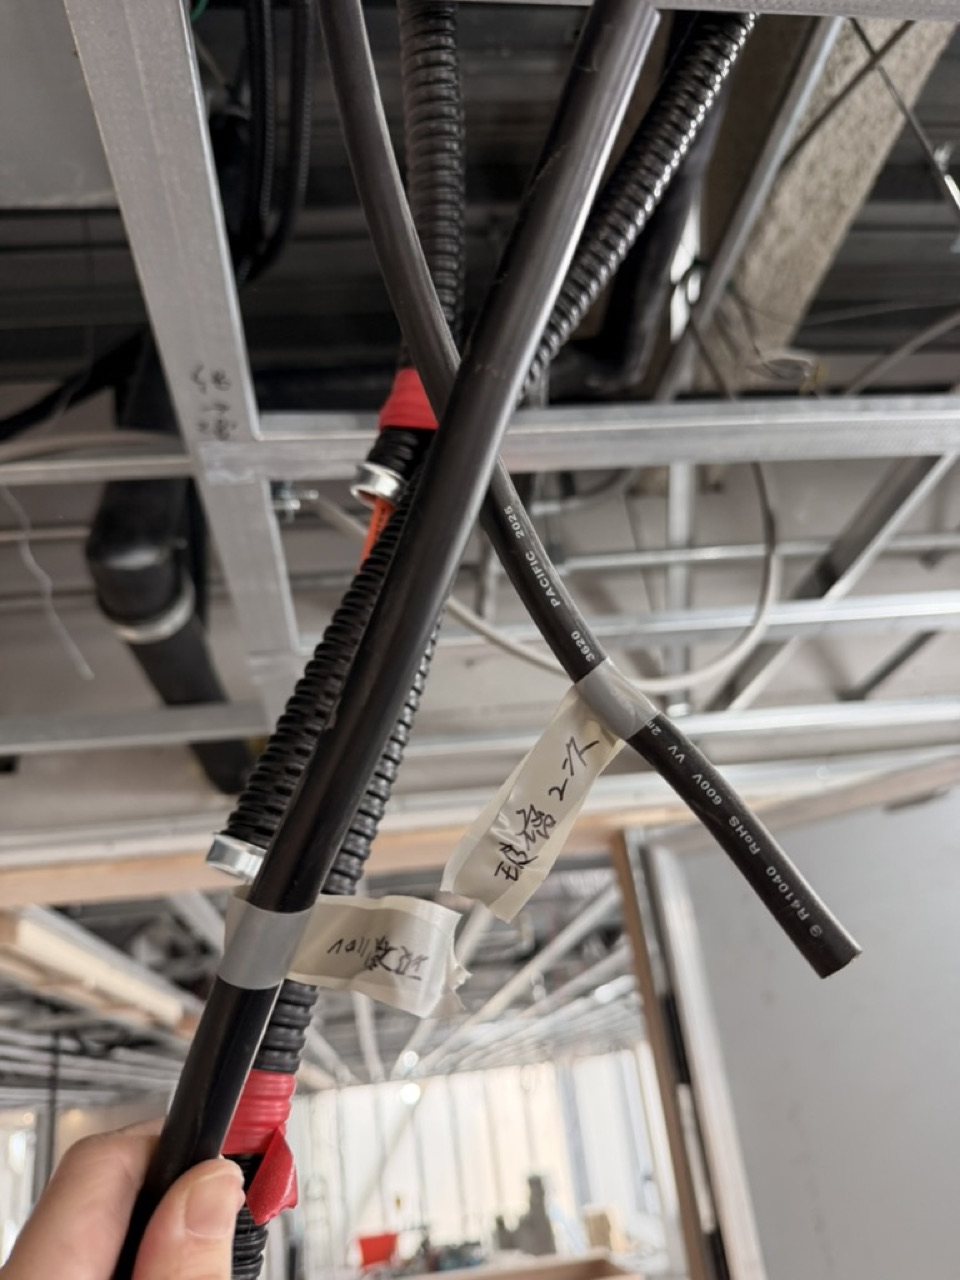
現場參考照片
Site Reference Photos
- 窗框溝槽 W 15 mm × D 20 mm(容納玻璃 + 電極 + 墊片 + 矽利康)
- 窗框頂部 + 底部各預留出線孔給二次線
- 玻璃兩側以中性 Silicone 矽利康封邊(指定品牌:Dow Corning N2 / Toshiba 381)
- 現場需有 110V 插座供變壓器使用
- Frame groove W 15 mm × D 20 mm (accommodates glass + electrode + setting block + silicone)
- Wire exit holes at the top and bottom of the frame for the secondary wires
- Seal both glass edges with neutral silicone (specified brands: Dow Corning N2 / Toshiba 381)
- A 110V outlet on site is required for the transformer
技術細節(給工班 / 細部圖面)
Technical Detail (for installers / shop drawings)
| 窗框尺寸 | W 60 mm × D 45 mm |
|---|---|
| 窗框溝槽尺寸 | W 15 mm × D 20 mm(容納電極 + 玻璃 + 墊片 + 矽利康) |
| 窗框出線孔 | 頂部 + 底部各一處,位置依電極設計(單邊 / 雙邊)決定 |
| 玻璃 | 5+5 mm 膠合式電控玻璃 |
| 玻璃下方墊片 | 玻璃與窗框溝槽底間以墊片支撐 |
| 玻璃兩側固定 | 中性矽利康(Silicone) |
| 電極區寬度 | 6 mm(於玻璃上下緣或側緣) |
| 二次線 | 不帶電平波線,從電極延伸經窗框出線孔走到變壓器 |
| 變壓器至玻璃 A 點 | 使用 1.6 mm 白扁線連接 |
| Frame Dimensions | W 60 mm × D 45 mm |
|---|---|
| Frame Groove | W 15 mm × D 20 mm (accommodates electrode + glass + setting block + silicone) |
| Wire Exit Holes | One each at top and bottom; location depends on electrode layout (single- or double-edge) |
| Glass | 5+5 mm laminated smart glass |
| Setting Block | Supports the glass against the bottom of the frame groove |
| Side Fixing | Neutral silicone |
| Electrode Strip Width | 6 mm (along top/bottom or side edges of the glass) |
| Secondary Wire | Non-powered ribbon cable; runs from electrode through the frame exit hole to the transformer |
| Transformer → Glass Point A | Connect with 1.6 mm white flat cable |
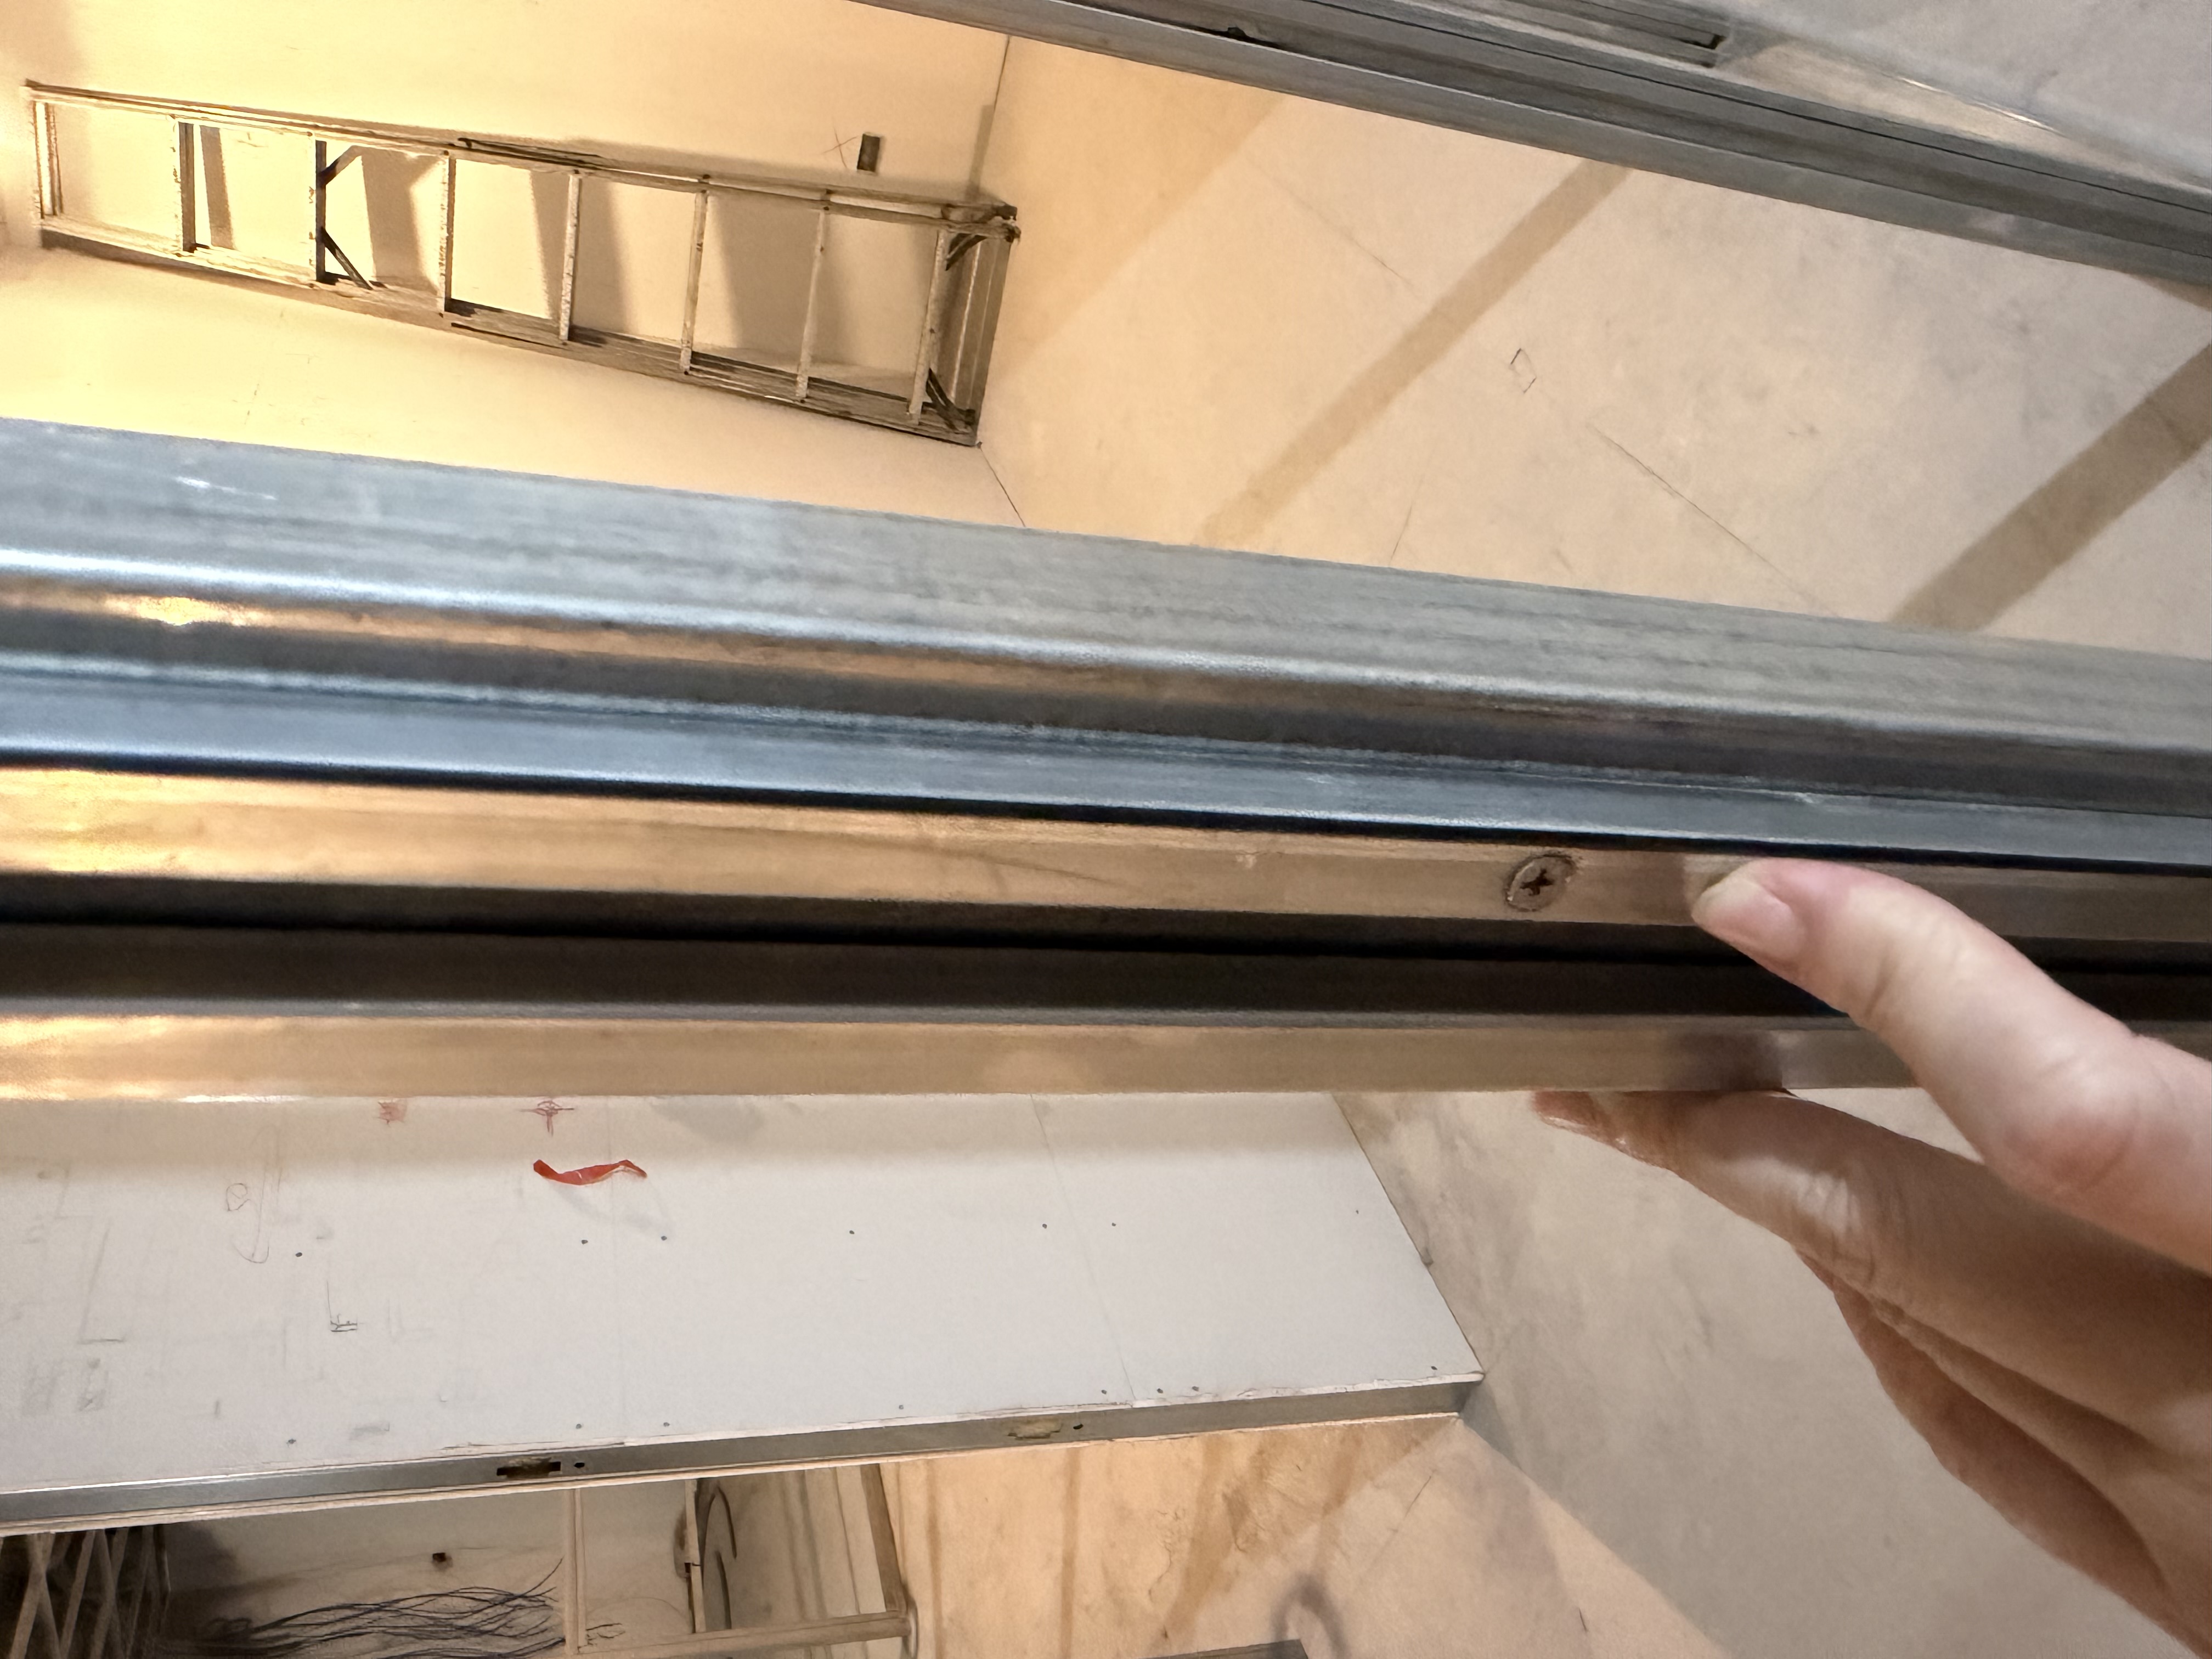
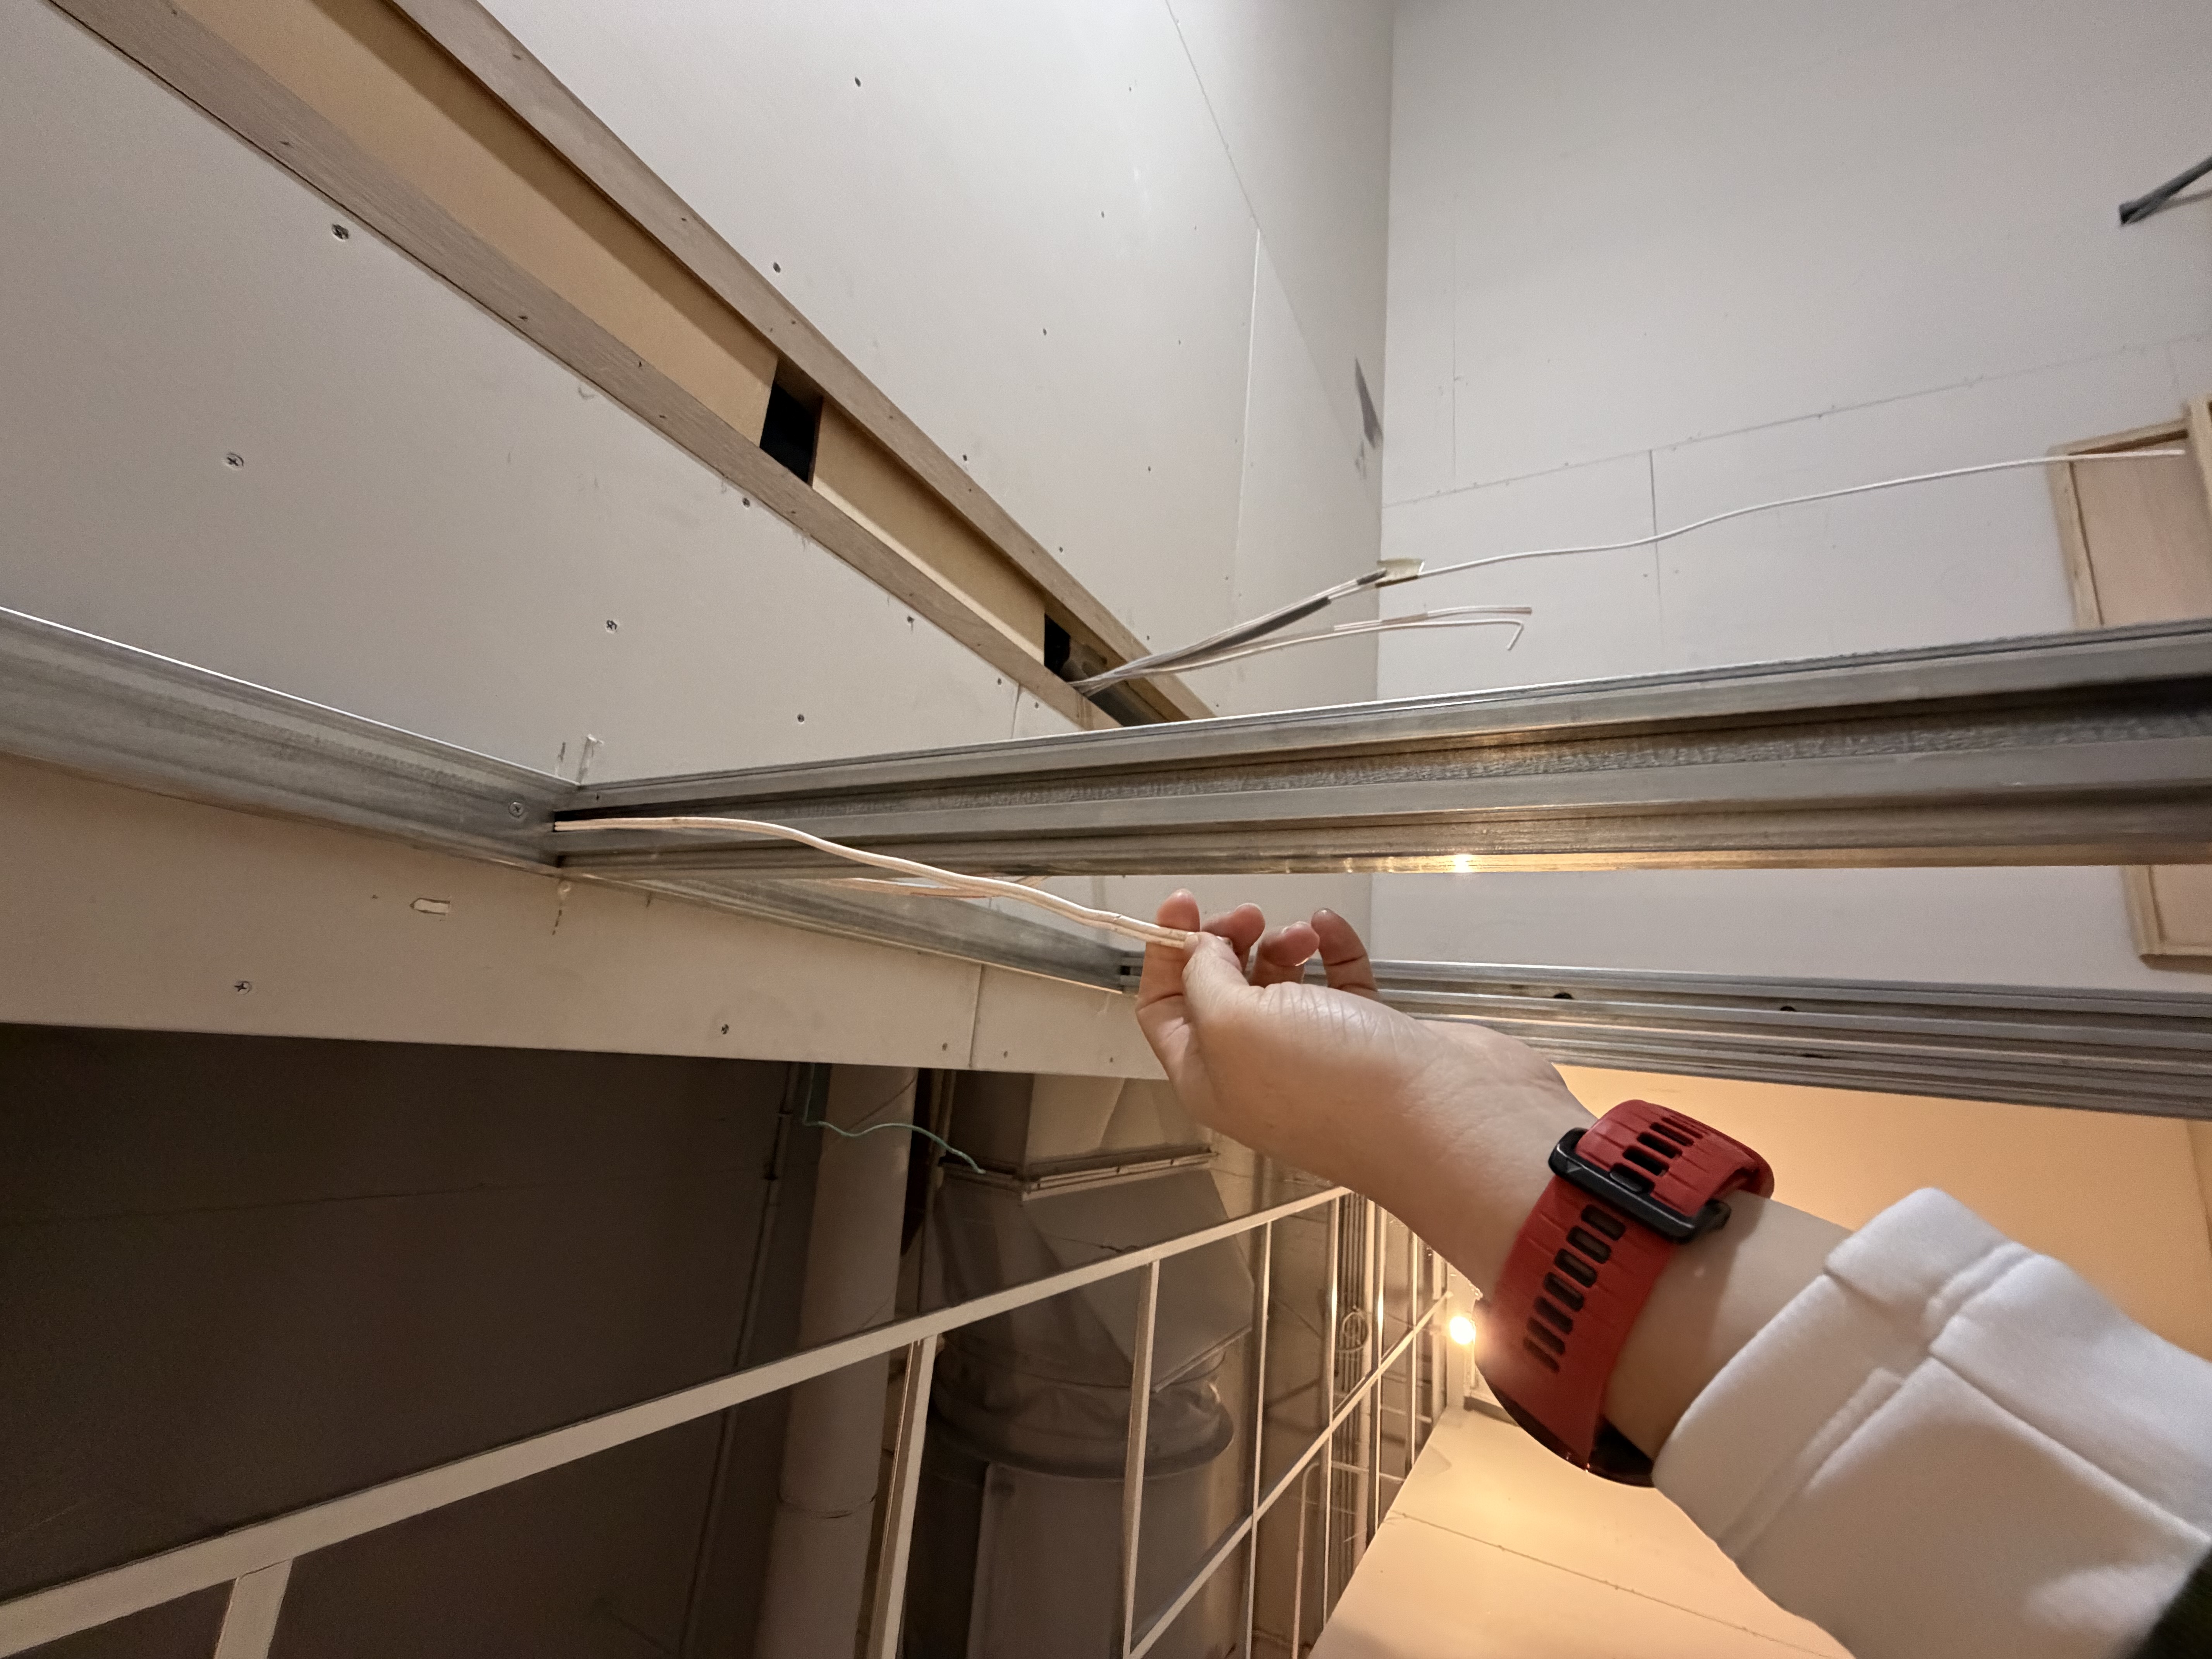
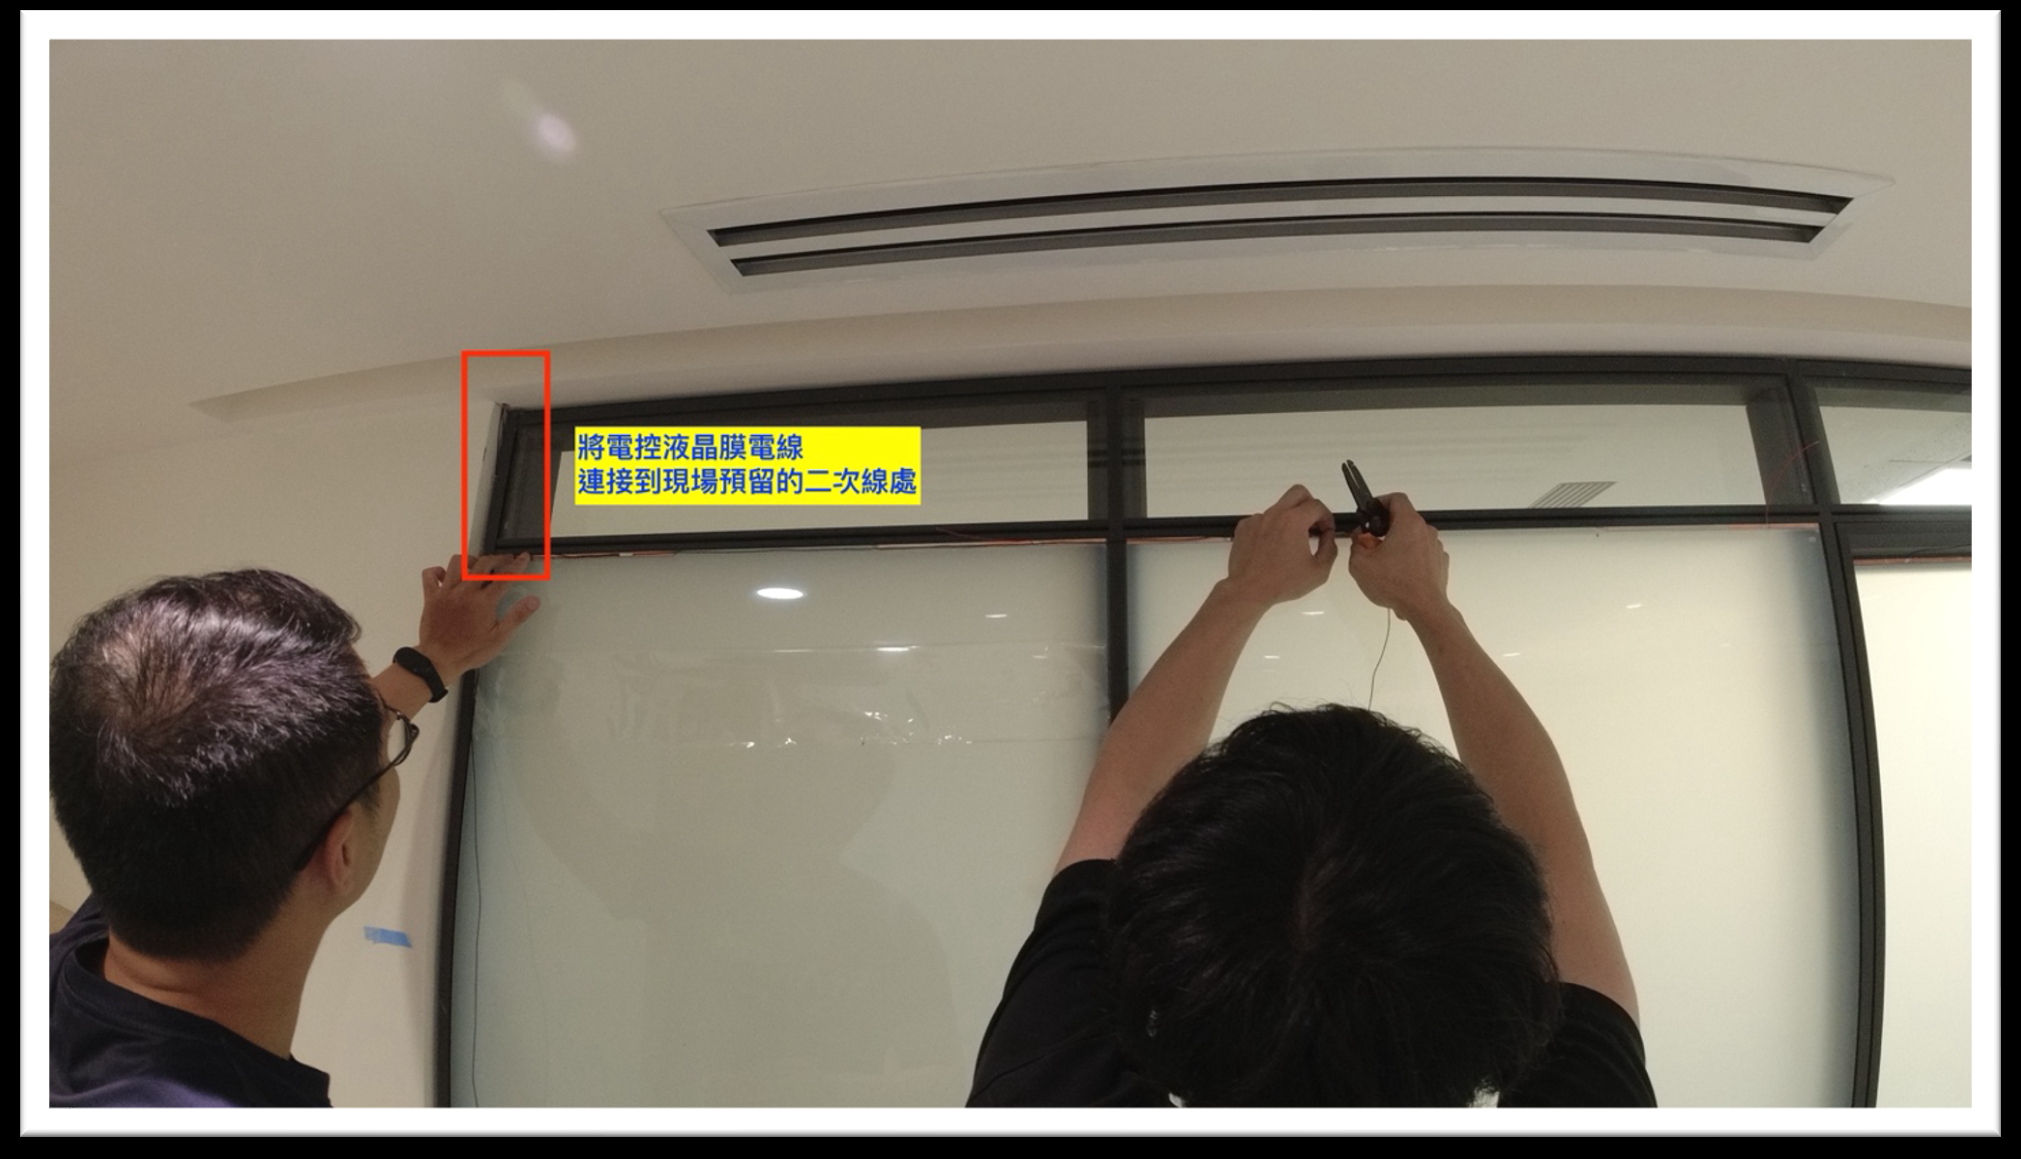
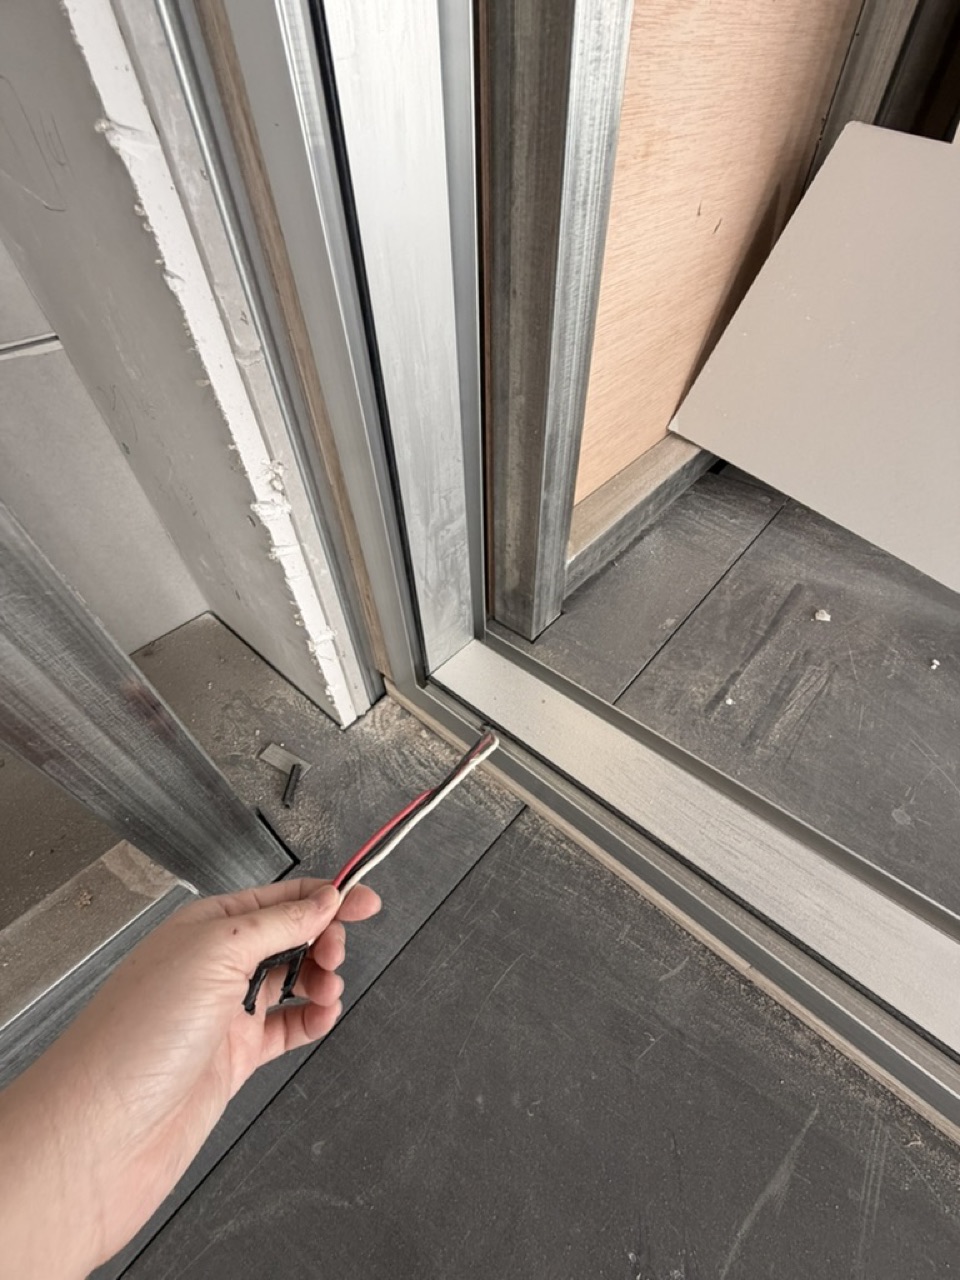
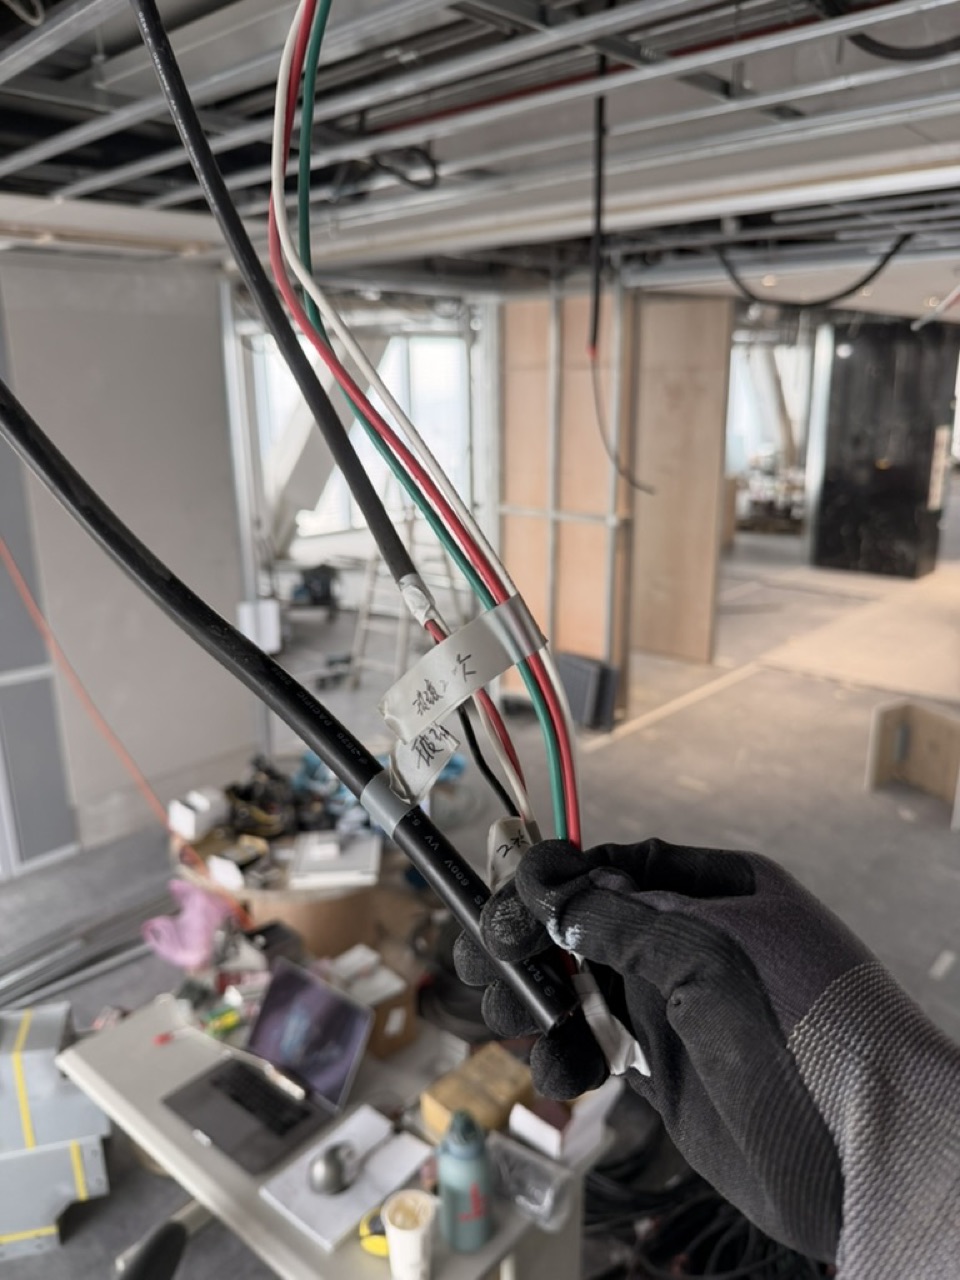
現地溝槽與預留二次線(平波線,不帶電)
Site Groove & Pre-Routed Secondary Wire (non-powered ribbon)
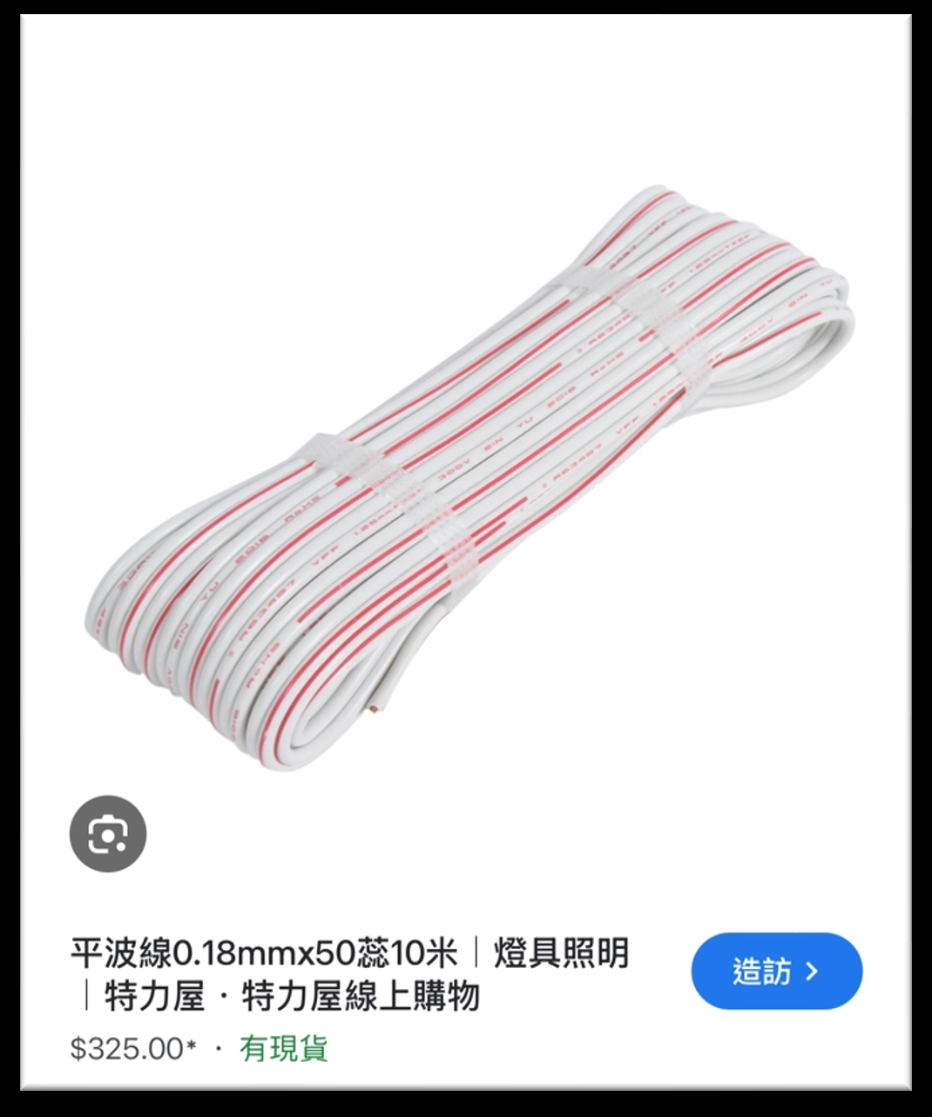
- 在需安裝電控玻璃的位置預留不帶電的二次線(平波線 0.18 mm × 50 蕊,10 米規格)。
- 此二次線將連接到明星電控配置之專用電控玻璃變壓器(AC 110V → AC 60/48V),現場需有 110V 插座供此變壓器使用,並需有放置變壓器的空間(變壓器尺寸請參考第 8 章)。
- 若是已經有玻璃需要後貼電控液晶調光膜,也需要預留電源插座以及二次線。並且要注意收邊條材質(要收納電線以及電極,寬約 10–12 mm),需與現場介面顏色相近,避免突兀。
- At each smart-glass location, pre-route a non-powered secondary wire (0.18 mm × 50-core ribbon cable, 10 m length).
- This wire connects to STARTEK's dedicated transformer (AC 110V → AC 60/48V). The site must provide a 110V outlet and space for the transformer (see Section 8 for dimensions).
- For retrofitting film onto existing glass, also reserve a power outlet and secondary wire. Match the edge trim (~10–12 mm wide, covering both wire and electrode) to the surrounding surface colour to avoid a visual clash.

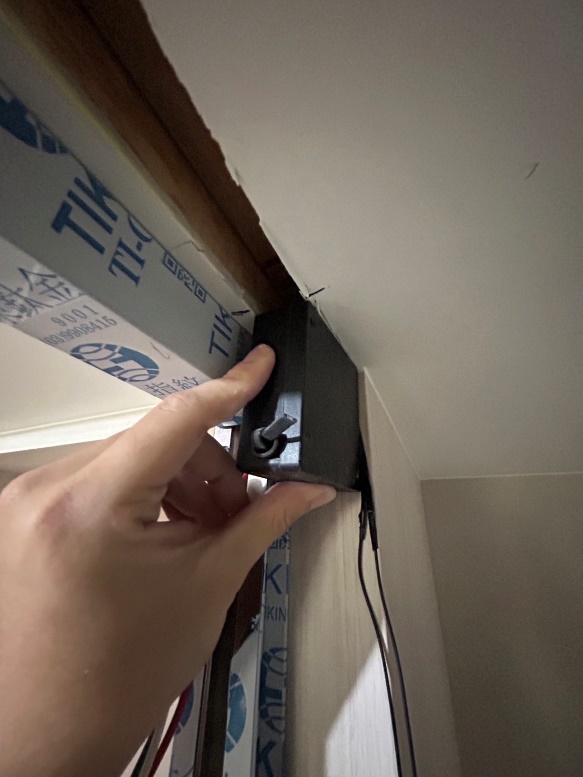
電控玻璃橫拉門 / 滑門 安裝施作
Sliding Door Installation
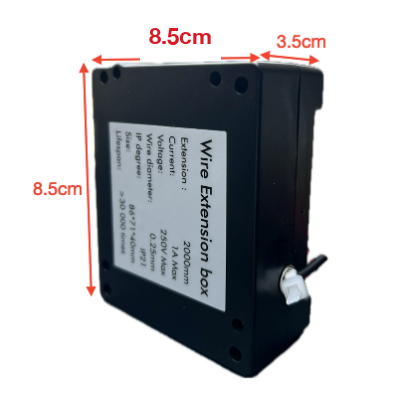
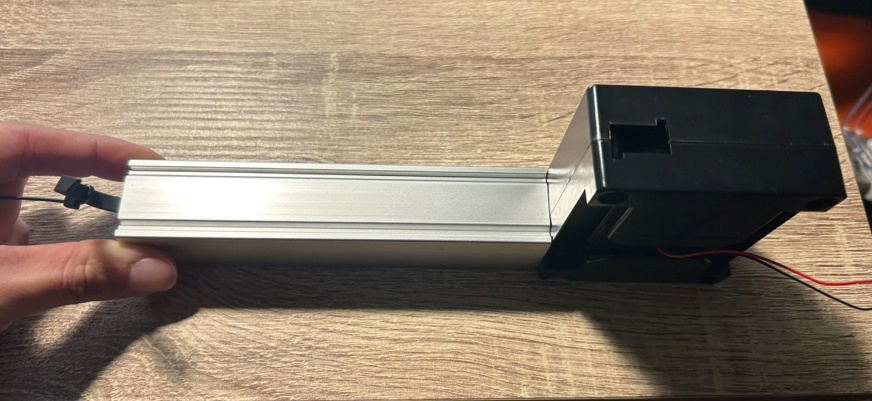
- 於軌道後方預留「伸縮電線盒」放置空間(尺寸:8.5 cm × 8.5 cm × 3.5 cm)。
- 伸縮電線處須開維修口,以便後續接線施工與維修更換。
- 伸縮線盒下緣需與軌道切齊,不能有高低落差。
- Reserve space behind the track for the "retractable wire box" (8.5 cm × 8.5 cm × 3.5 cm).
- Provide an access panel at the retractable wire box for wiring work and future maintenance.
- The bottom edge of the wire box must align flush with the track — no level difference is allowed.

腰帶式(中段)施工注意事項
Mid-Band Application — Installation Notes
常見情境:玻璃整片到底(單片大玻璃),液晶膜只貼中段橫向腰帶區,上下保留透明玻璃。這種做法視覺輕盈,但施工要特別處理三件事:
A common scenario: full-height glass (single large panel) with film applied only to a horizontal mid-band, leaving the top and bottom transparent. The result looks light and elegant, but three things need attention on site:
- 液晶膜邊緣外露 — 膜的橫截面(厚度方向約 0.27–0.55 mm)會在腰帶上下緣露出,視覺上看得到膜邊。需以收邊條覆蓋以保持整體美觀。
- 電極區(銀漿 / 銅網)必須遮蔽 — 收邊條規格與後貼調光膜同(寬約 10–12 mm),須與現場介面(玻璃框、牆面)顏色相近,避免突兀。
- 二次線出線規劃 — 因玻璃整片到底,膜只在中段,二次線從電極上緣出線後沒有自然路徑可藏。需事先與設計師確認出線方向(往天花、往側框、或藏入特殊收邊條),並在現場預留對應通道。
- Exposed film edge — the cross-section of the film (0.27–0.55 mm) shows at the top and bottom of the mid-band and is visually noticeable. Cover with edge trim to keep the appearance clean.
- Electrode strip (silver paste / copper mesh) must be concealed — same trim spec as retrofit film (~10–12 mm wide); match the surrounding colour (frame, wall) to avoid a visual clash.
- Plan the secondary wire exit — because the glass runs full-height with film only at the mid-band, the wire has no natural path to hide after exiting the top of the electrode. Confirm the exit direction with the designer in advance (ceiling, side frame, or hidden trim) and reserve the corresponding channel on site.
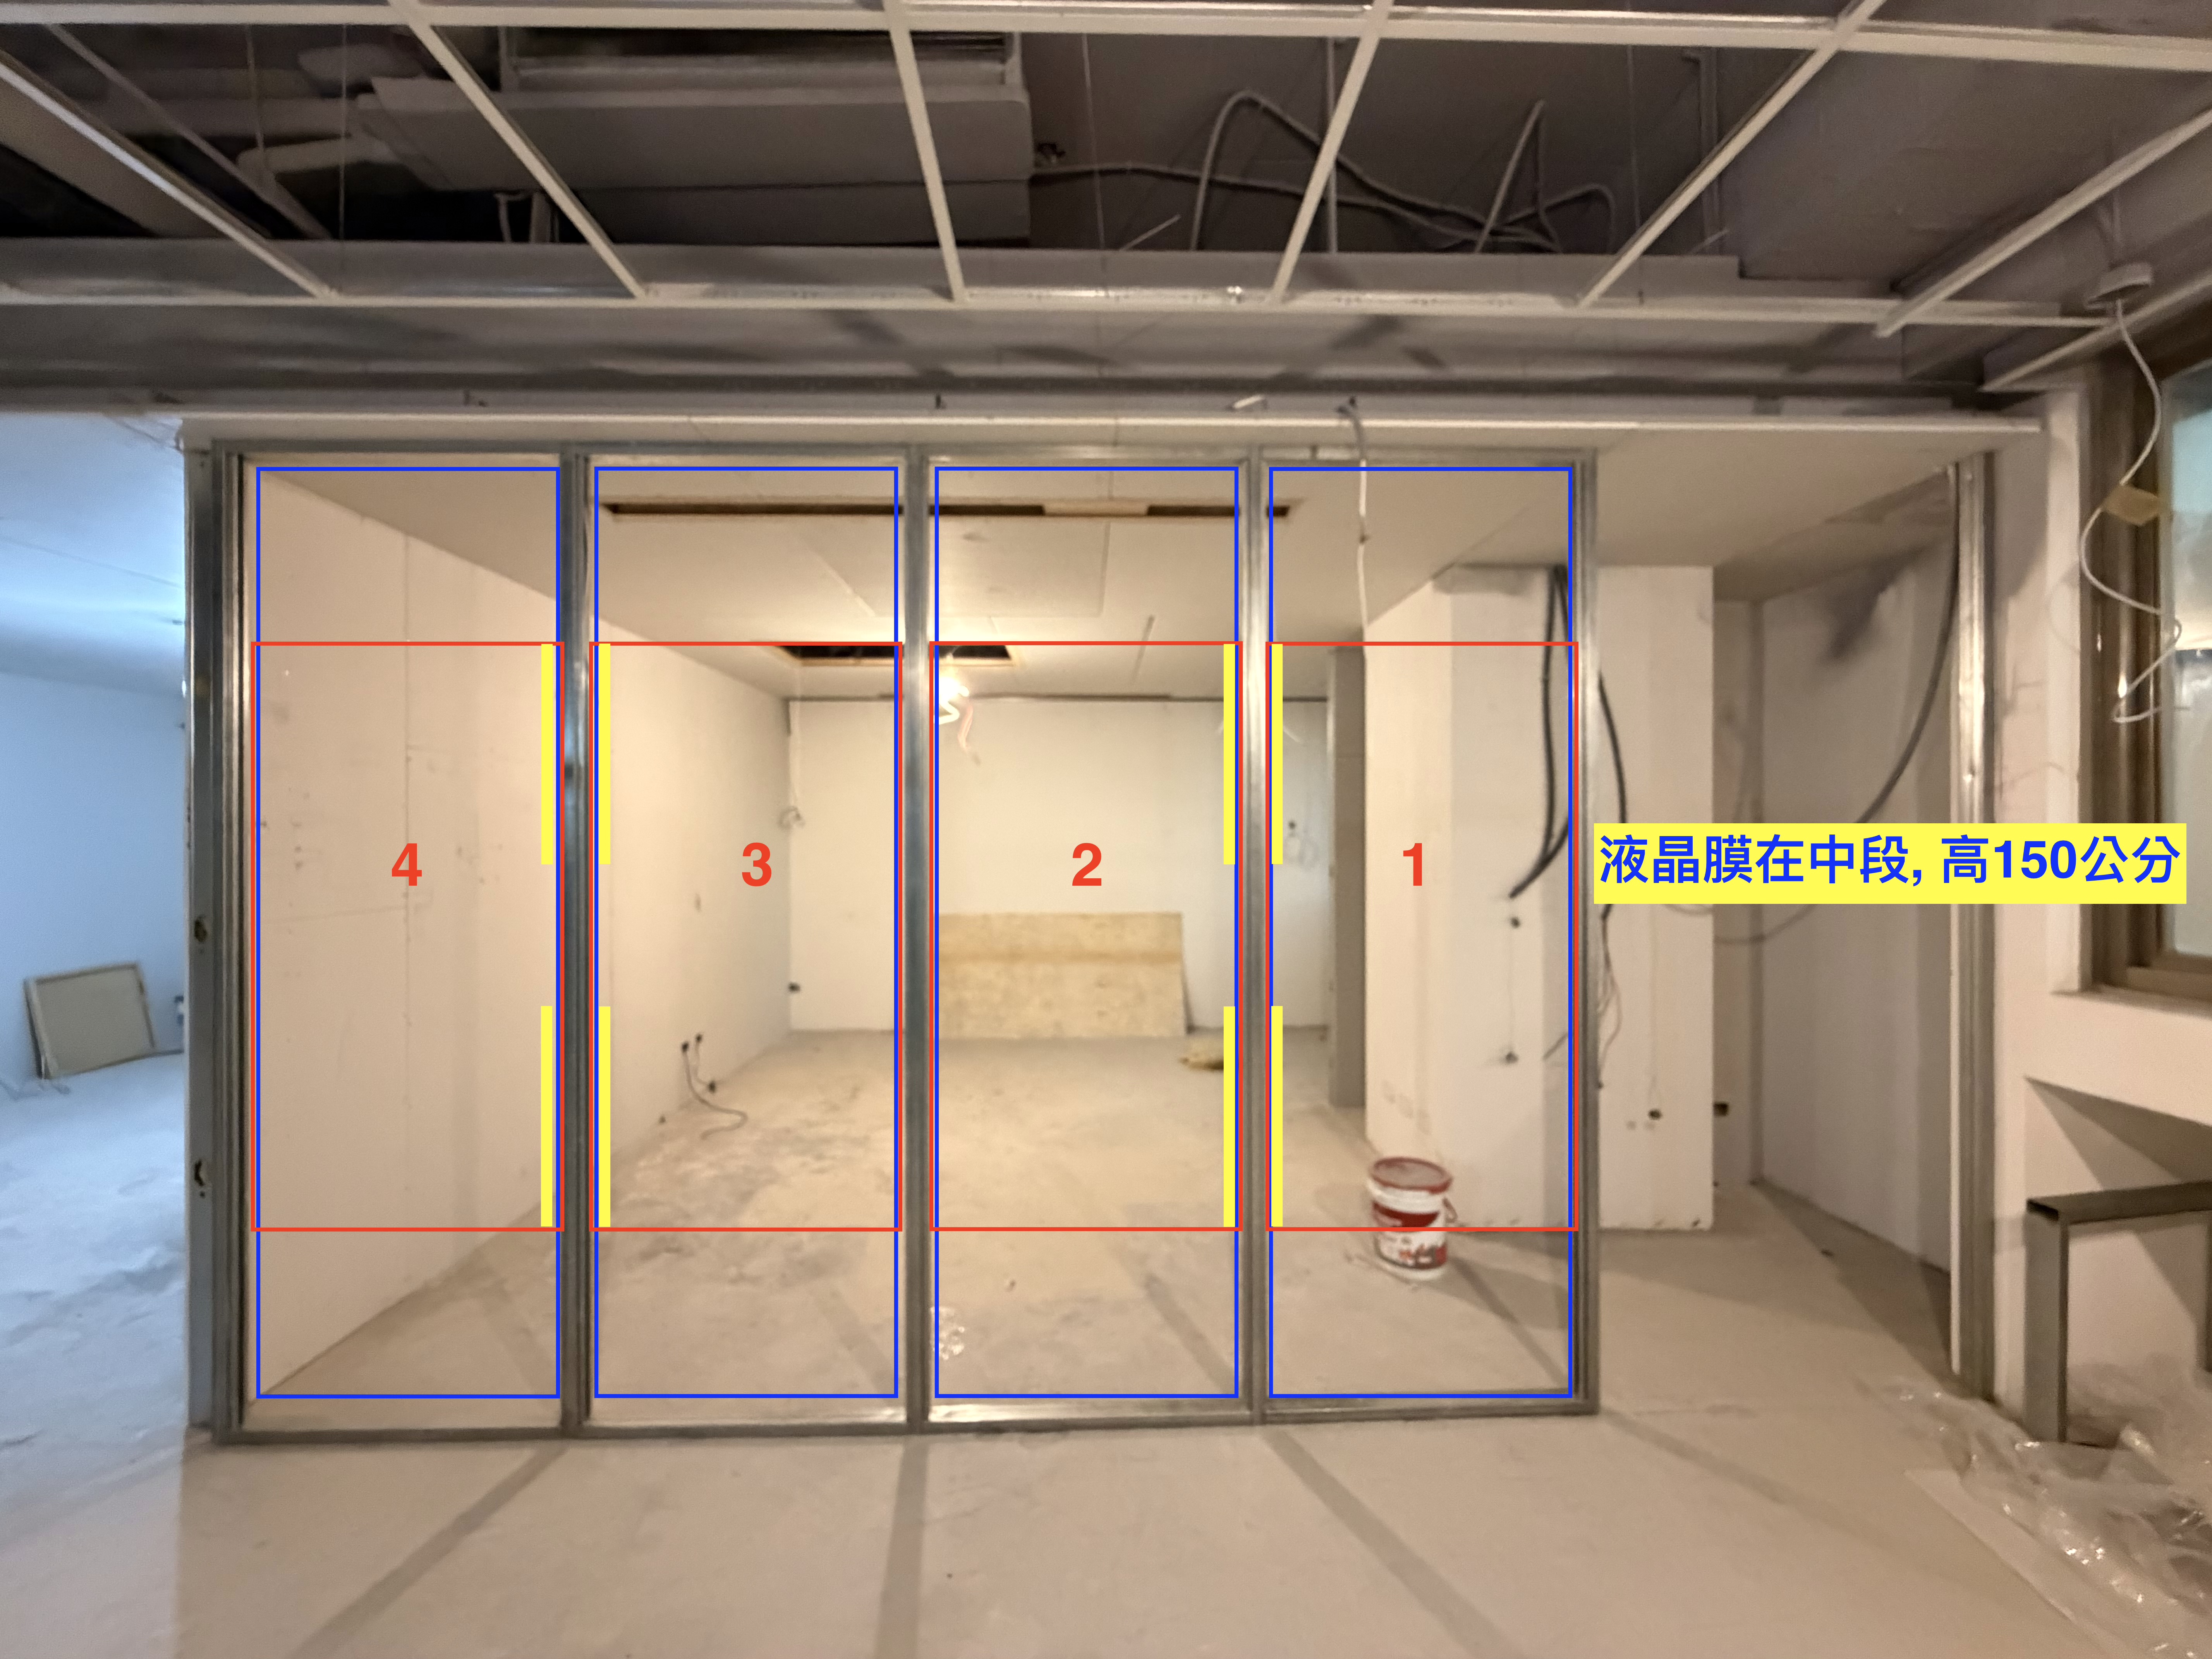
電梯尺寸確認(進場前必確認)
Elevator Size Check (Confirm Before Delivery)
大尺寸玻璃(尤其 STARTEK 1 系列最大可至 4,500 × 2,000 mm,明基系列至 1,500 × 3,000 mm)進場時,能否搬入是首要問題。客戶在規劃玻璃分割尺寸時,務必同時確認以下兩組電梯尺寸:
For large panels (STARTEK 1 Series up to 4,500 × 2,000 mm, BenQ Series up to 1,500 × 3,000 mm), the first question is whether the glass can physically be brought in. When planning panel divisions, customers must confirm both sets of elevator dimensions:
- 電梯開門尺寸(藍色標示)— 寬 W、高 H:決定玻璃能否「水平」搬入電梯。
- 電梯車廂尺寸(紅色標示)— 寬 W、深 D、高 H:玻璃進入電梯後是否能直立、斜放或平放,受車廂內部三軸限制。
- Elevator door opening (blue) — Width W, Height H: determines whether the glass can be carried horizontally into the car.
- Elevator car interior (red) — Width W, Depth D, Height H: determines whether, once inside, the glass can stand upright, lean, or lie flat — constrained by all three axes.
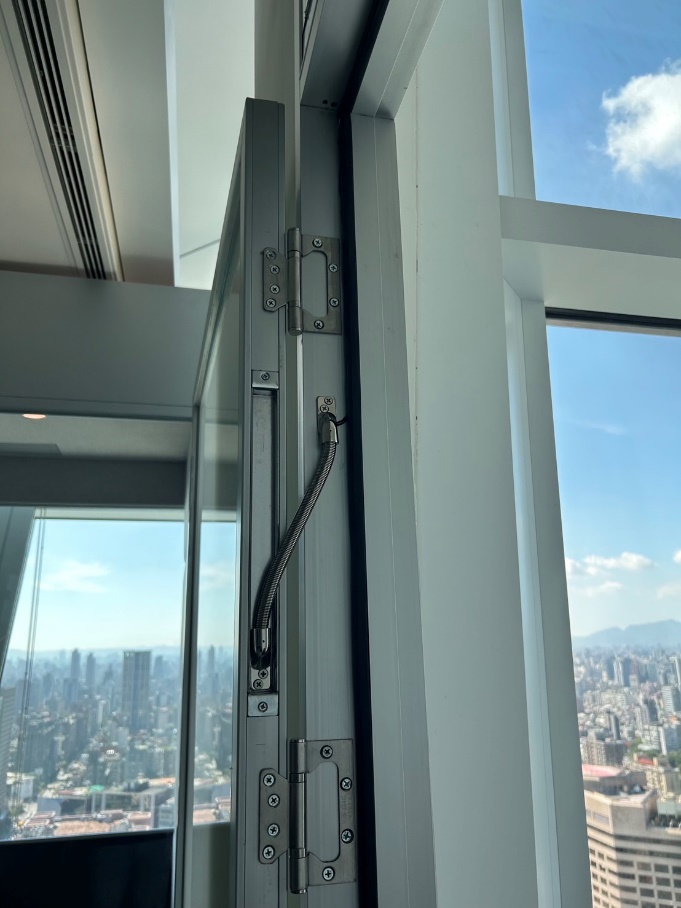
有框開關門 安裝施作
Framed Swing Door Installation
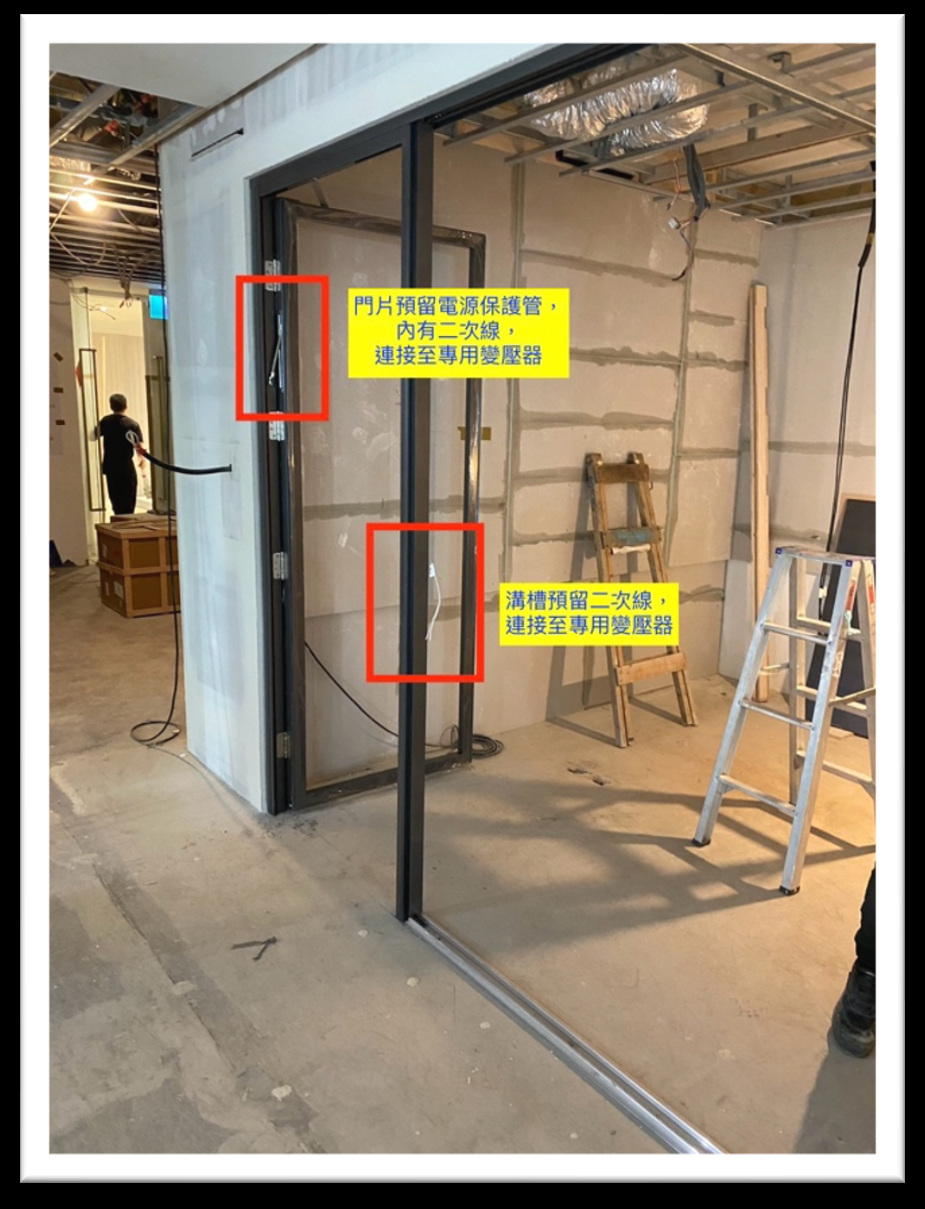
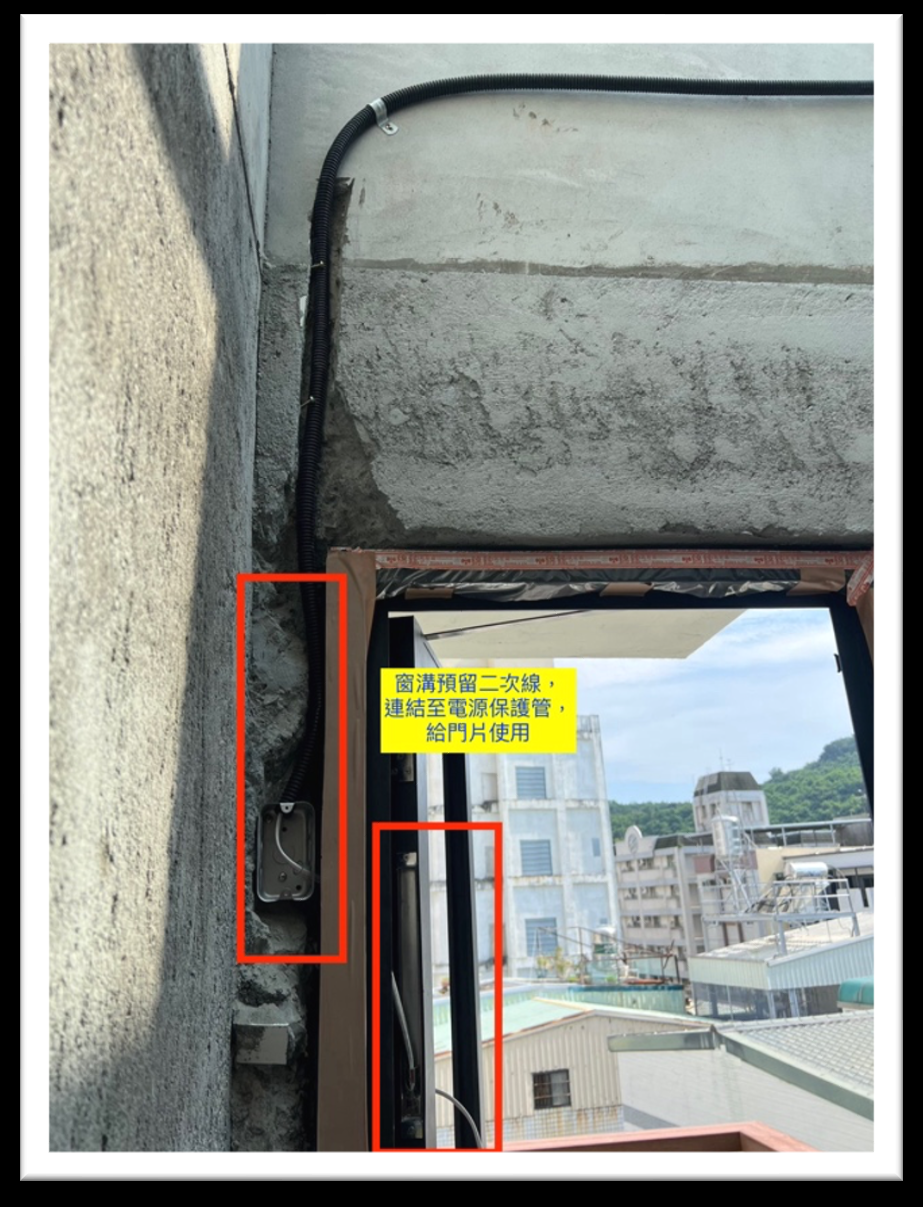
- 適用於「單向開」且五金為「蝴蝶鉸鍊」的做法。
- 於門框及門斗框預埋「電源保護管」。
- 電線從天花板落至門斗框內,經「電源保護管」與進入門框與電控玻璃相接。
- Applies to single-direction swing doors with butterfly-hinge hardware.
- Pre-embed a "power conduit" inside the door frame and head frame.
- Wires drop from the ceiling into the head frame, run through the conduit, and connect to the glass inside the door frame.
電極位置規劃建議
Electrode Placement Guidelines
當尺寸比超過 1:4 時(例:300 × 1500 mm)
When aspect ratio > 1:4 (e.g. 300 × 1500 mm)
電極位置設計不得僅沿著短邊使用,可只沿著長邊使用,或在任意兩條邊上使用。
The electrode cannot be placed only on the short edge. It may be placed on the long edge alone, or along any two edges.
當尺寸比不超過 1:4 時(例:821 × 1952 mm)
When aspect ratio ≤ 1:4 (e.g. 821 × 1952 mm)
電極位置設計可以沿著任何一邊使用。
The electrode may be placed along any edge.
最大尺寸 1500 × 3500 mm 時
At maximum size 1500 × 3500 mm
必須使用兩邊電極位置設計,兩邊電極可以在任意兩邊使用。
A two-edge electrode design is required. The two edges may be any pair of edges on the panel.
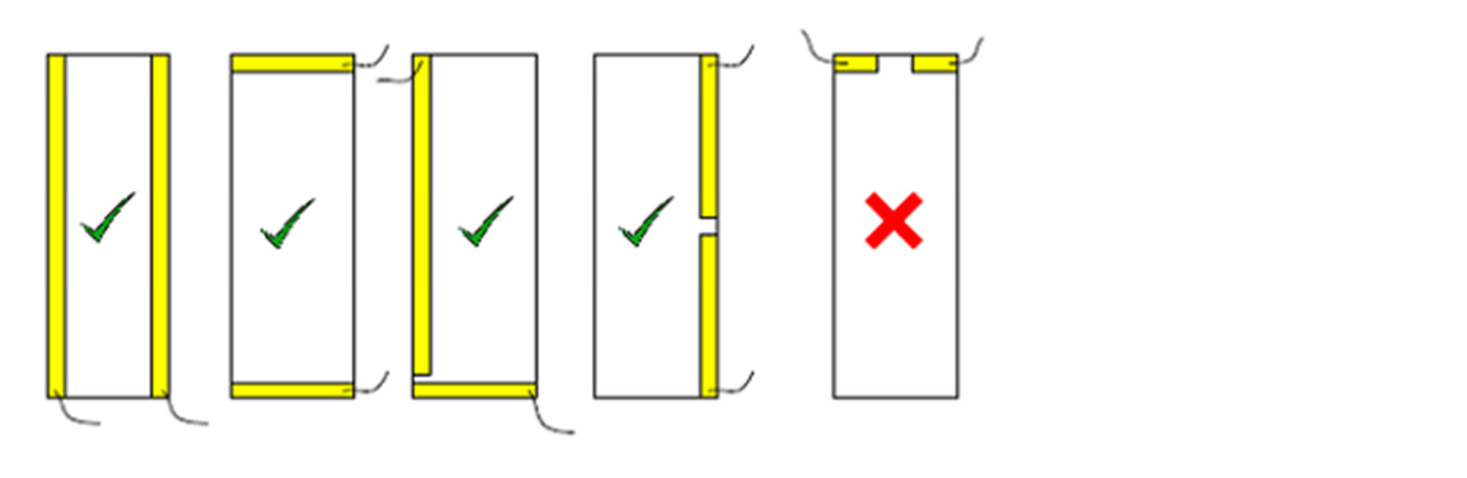
Busbar Model · 依玻璃尺寸選用
Busbar Model · Selection by Panel Size
原廠(InnoGlass)對不同尺寸的 PDLC / Startek R / EP 智能膜分別建議 4 種 busbar 配置(Model A / B / D / C),依玻璃高度(H)與高寬比(H : W)判斷。圖中黃色 / 藍色長條即電極(busbar)位置。
The film manufacturer (InnoGlass) recommends one of four busbar configurations (Model A / B / D / C) depending on panel height (H) and the height-to-width ratio (H : W). The yellow / blue strips in each illustration represent the electrode (busbar) location.
Model A · 頂端兩段(正負分極)Top edge (split + / −)
PDLC:H < 2.7m 且 H/W < 7
Startek R:H < 1.5m
EP(SPD):H < 2.7m 且 H/W < 7
PDLC: H < 2.7m and H/W < 7
Startek R: H < 1.5m
EP (SPD): H < 2.7m and H/W < 7
Model B · 頂底兩端Top & bottom edges
PDLC:2.7m ≤ H < 3.3m 或 H < 2.7m 但 H/W ≥ 7
Startek R:不適用
EP(SPD):2.7m ≤ H < 3.3m 或 H/W ≥ 7
PDLC: 2.7m ≤ H < 3.3m, or H < 2.7m with H/W ≥ 7
Startek R: Not applicable
EP (SPD): 2.7m ≤ H < 3.3m, or H/W ≥ 7
Model D · 頂底兩端(各自分極)Top & bottom (each split + / −)
PDLC:3.3m ≤ H < 5m 或 H < 3.3m 但 H/W ≥ 7
Startek R:1.5m ≤ H < 3m 或 H < 1.5m
EP(SPD):3.3m ≤ H < 5m 或 H/W ≥ 7
PDLC: 3.3m ≤ H < 5m, or H < 3.3m with H/W ≥ 7
Startek R: 1.5m ≤ H < 3m, or H < 1.5m
EP (SPD): 3.3m ≤ H < 5m, or H/W ≥ 7
Model C · 單側邊(上下分極)One side edge (split + / −)
PDLC:H ≥ 5m 或 H < 5m 但 H/W ≥ 7
Startek R:H ≥ 3m 或 H ≤ 3m 但 H/W ≥ 7
EP(SPD):H ≥ 5m 或 H/W ≥ 7
PDLC: H ≥ 5m, or H < 5m with H/W ≥ 7
Startek R: H ≥ 3m, or H ≤ 3m with H/W ≥ 7
EP (SPD): H ≥ 5m, or H/W ≥ 7
ITO 表面阻值要求(出貨前處理 / 拭膠後檢測)
ITO Sheet Resistance (post-cleaning QC)
| 膜種 | 清潔方式 | 方阻 (Ω) |
|---|---|---|
| PDLC | 無塵紙輕拭 polymer,避免傷 ITO | < 300 Ω(< 200 Ω 最佳) |
| Startek R(PNLC / DLC) | 因多一層絕緣層,先除聚合物後,用沾無水酒精的無塵紙稍施力擦淨絕緣層 | < 300 Ω(150–220 Ω 最佳) |
| EP(SPD) | 無塵紙輕拭,注意不傷 ITO | < 300 Ω(一般 100–300 Ω) |
| Film | Cleaning | Sheet R (Ω) |
|---|---|---|
| PDLC | Wipe polymer gently with dust-free paper; ITO is fragile | < 300 Ω (< 200 Ω ideal) |
| Startek R (PNLC / DLC) | Has an extra insulating layer above ITO; after removing polymer, wipe the insulating layer firmly with dust-free paper moistened with anhydrous ethanol | < 300 Ω (150–220 Ω ideal) |
| EP (SPD) | Wipe gently with dust-free paper; protect the ITO | < 300 Ω (typically 100–300 Ω) |
電極設計與穿透率關係(合約條款補充)
Electrode Design vs. Transmittance (Contract Supplement)
變壓器 / 遙控器說明
Transformer & Remote
STARTEK 專用變壓器 + 遙控器
STARTEK Dedicated Transformer + Remote
STARTEK 專用變壓器
- 尺寸 110 × 46 × 179 mm,1.6 kg
- 輸入 110 VAC 或 220 VAC
- 輸出 65 VAC
- 瓦數 100 W
- 2 年保固,CE 認證
STARTEK 無線遙控器
- 無線控制(433 MHz)
- 電池 12 VDC
- 控制距離 > 25 m
- 尺寸 120 × 46 × 14 mm,80 g
STARTEK Dedicated Transformer
- Size 110 × 46 × 179 mm, 1.6 kg
- Input 110 VAC or 220 VAC
- Output 65 VAC
- Power 100 W
- 2-year warranty, CE certified
STARTEK Wireless Remote
- Wireless control (433 MHz)
- Battery 12 VDC
- Range > 25 m
- Size 120 × 46 × 14 mm, 80 g
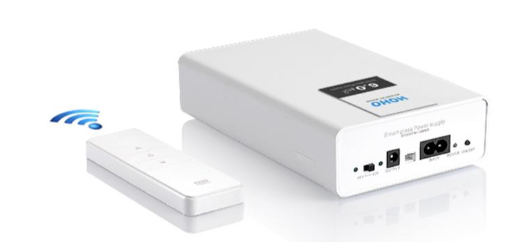
明基 AWS100 專用電源 + 遙控器
BenQ AWS100 Power Supply + Remote
搭配明基 PDLC 系列(STARTEK 2 / 3 / EX 系列)電控玻璃使用,明基官方 1 年保固。
Used with the BenQ PDLC series (STARTEK 2 / 3 / EX). BenQ-official 1-year warranty.

PDLC 專用電源
- 尺寸 69 W × 242 L × 44.54 H mm(公差 ±0.2 mm)
- 輸入 100 ~ 240 VAC(國際通用)
- 輸出 48 VAC(低電壓設計)
- 12 階透光度調整
- 支援群組配對(一對多 / 多對一)
- CB / CE / CCC / BSMI 安規通過
- 操作環境 0 ~ 40°C,20 ~ 90% RH
- 1 年保固
無線遙控器
- 頻率 433.92 MHz(穿牆能力佳、低電磁波)
- 無障礙 + 干擾條件下控制距離 達 50 m
- 電池 CR2032,正常使用 3 年
- 免鑽孔牆面安裝(背板 + 雙面膠)
PDLC Power Supply
- Size 69 W × 242 L × 44.54 H mm (tolerance ±0.2 mm)
- Input 100–240 VAC (worldwide)
- Output 48 VAC (low-voltage design)
- 12-level transparency adjustment
- Group pairing (one-to-many / many-to-one)
- CB / CE / CCC / BSMI certified
- Operating environment 0–40°C, 20–90% RH
- 1-year warranty
Wireless Remote
- Frequency 433.92 MHz (good wall penetration, low EMF)
- Range up to 50 m in clear, interference-free conditions
- CR2032 battery, ~3-year typical life
- No-drill wall mount (backplate + double-sided tape)
明基 AWS100 配對流程(首次安裝 / 換新)
BenQ AWS100 Pairing (First Install / Replacement)
- 燈號確認 — 先確認接線正確,移除遙控器電池保護膜,按 ON 鍵 — 亮橘燈代表正常。
- 進入配對狀態 — 連續按住電源連接鈕 5 秒,直到 LED 閃綠燈再放開。
- 配對遙控器 — 在 15 秒內按下遙控器 ON 鍵 3 秒。
- 結束配對 — 再按一次電源連接鈕,停止閃爍即完成。
- LED check — Verify wiring, remove the remote's battery insulator, press ON — an orange light indicates normal status.
- Enter pairing mode — Hold the power-pairing button for 5 seconds until the LED flashes green, then release.
- Pair the remote — Within 15 seconds, press the remote's ON button for 3 seconds.
- Exit pairing — Press the power-pairing button once more; pairing is complete when the LED stops flashing.
- 按 ON 鍵不亮:電池沒電,需更換 CR2032
- 按 ON 鍵快閃:電池即將沒電,需更換
- 按 ON 鍵閃一次:正常動作
- 遙控器按下後,電源 LED 應閃一下;若不閃,重新配對
- ON button no light: battery dead, replace CR2032
- ON button rapid flashing: battery low, needs replacing
- ON button single flash: normal operation
- After pressing the remote, the power LED should flash once; if not, re-pair
故障排除
Troubleshooting
故障排除流程
Troubleshooting Procedure
打開電源,確認電控玻璃是否變成透明。如果一個或多個電控玻璃出現故障:
Power on and check whether the glass turns transparent. If one or more panels fail to respond:
- 檢查變壓器確認電源;如果變壓器並未通電,確認電源來源問題。
- 檢查壁面開關確認電源;如果壁面開關沒有通電,檢查連接或更換壁面開關。
- 檢查電控玻璃電源輸入,以確認電源;如果沒有從變壓器來的電,檢查與變壓器之間的佈線。
- 檢查變壓器與有影響的電控玻璃之間的輸出,以確認電源;如果變壓器沒有輸出,保險絲可能已經熔斷,更換保險絲。
- Check the transformer for power. If the transformer is not powered, investigate the power source.
- Check the wall switch for power. If the switch is not powered, inspect the wiring or replace the switch.
- Check the power input at the glass. If no current is coming from the transformer, inspect the wiring between glass and transformer.
- Check the transformer's output to the affected glass. If there is no output, the fuse may have blown — replace the fuse.
接收注意事項
Receiving Notes
在簽收和接受承運人的貨物之前,對包裝外箱進行以下檢查:
Before signing for and accepting delivery from the carrier, inspect the packaging as follows:
- 檢查包裝外箱是否損壞。
- 如果有任何可能損壞跡象,應立即在承運人在場的情況下,打開箱體,檢查每片電控玻璃是否有損壞。如果您沒有檢查貨物,承運人或明星電控科技都不對隨後出現的損壞負責。
- 如果發現任何一個或多個玻璃損壞,應在裝運單據上註明,並請駕駛員簽名作為見證。如有任何損壞的面板,應立即通知明星電控科技並提供照片,將運費索賠儘早提交給承運人。
- Inspect the outer packaging for damage.
- If any sign of damage is visible, open the crate immediately in the presence of the carrier and inspect each panel. If goods are not inspected at delivery, neither the carrier nor STARTEK is responsible for damage discovered later.
- If any panel is damaged, note this on the shipping document and have the driver sign as witness. Notify STARTEK immediately with photos, and submit the freight claim to the carrier as soon as possible.
產品保固條件
Warranty Terms
明星電控科技股份有限公司(以下稱 STARTEK)所有提供的電控玻璃產品皆經過專業測試,符合 STARTEK 對品質的嚴格要求,並符合一般室內商業場所、辦公室與家庭的日常使用標準。在室內環境裡,室溫條件與正常操作使用下,產品保固範圍只限於包括非人為因素造成產品無法正常切換透明與遮蔽、自然脫落、自然剝離等產品損害現象。
All smart-glass products supplied by STARTEK Smart Glass Technology Co., Ltd. (hereinafter "STARTEK") are professionally tested and meet STARTEK's strict quality standards, suitable for daily use in commercial, office, and residential interiors. Indoors, at normal room temperature and under normal operation, the warranty covers product failures not caused by external factors — including failure to switch between transparent and opaque, natural detachment, or natural delamination.
除特殊條件外,STARTEK 提供顧客有限責任保固(如下列式)以發票日期為起算時間:
Except where special terms apply, STARTEK provides the following limited warranty, calculated from the invoice date:
| 項目 | 保固年限 |
|---|---|
| 電子相關設備 | 2 年 |
| 五金配件介面 | 3 年 |
| 玻璃製品相關 | 5 年 |
| Item | Warranty Period |
|---|---|
| Electronic equipment | 2 years |
| Hardware accessories & interfaces | 3 years |
| Glass products | 5 years |
產品別實際保固年限(依驗收日起算)
Actual Warranty by Product (from acceptance date)
| 產品 | 標準保固 | 延長保固 |
|---|---|---|
| 5+5 mm 膠合式電控玻璃 | 5 年 | 7 年 |
| 直貼式電控液晶導電膜 | 1 年 | 3 年 |
| 明基材料 BenQ 系列 | 5 年 | 10 年 |
| 變壓器 | 2 年(非人為破壞) | |
| Product | Standard | Extended |
|---|---|---|
| 5+5 mm Laminated Smart Glass | 5 years | 7 years |
| Self-Adhesive PDLC Film | 1 year | 3 years |
| BenQ Series Material | 5 years | 10 years |
| Transformer | 2 years (non-human damage) | |
保固條款細則
Warranty Terms — Details
- STARTEK 不負擔任何其他非產品相關之物件損壞或人員傷害的索賠。顧客需遵守產品的使用與保養指南,才能享有品質保證服務。
- 在保固期間內,顧客若發現產品有述異常情況,請先聯繫原購買之授權經銷商並敘述異常情況之細節(時間、區域,並提出相關照片或影片),授權經銷商的服務人員會先了解或派員到現場檢視你的產品。
- 若符合產品保固範圍,授權經銷商會決定替你維修商品或以相同或同等級之產品替換,但無法以相同生產批次與相同色彩來替換。
- STARTEK 與授權經銷商不負擔產品修理或更換時所產生之移除、更換、安裝的人員費用或任何所需運送產生的物流的費用。
- 若產品不符合保固範圍,仍交由 STARTEK 維修者,將向你收取維修、材料、安裝與物流等必要費用。
- 如果 STARTEK 不再銷售該產品,將提供適合的替代產品為你更換;若替代產品價格較高則須補足差額。
- 產品保固之服務工作只限於台灣境內作業。已更換之新產品若是保固產品,其所享有之品質保證年限,將依原產品之購買日期開始計算。STARTEK 保留是否更換或更換產品種類的決定權。
- STARTEK 保留修正此品質保證條款與細則之權利。
- STARTEK is not liable for damage to non-product items or personal injury claims. Customers must follow the product's use and care guidelines to be entitled to warranty service.
- If the customer discovers any abnormality during the warranty period, contact the original authorised dealer with details (time, location, and supporting photos/videos). The dealer's service team will assess remotely or dispatch staff to the site.
- If the issue is within warranty scope, the authorised dealer will decide whether to repair or replace with the same or equivalent product. Same production batch and exact colour cannot be guaranteed.
- STARTEK and authorised dealers do not bear the labour costs of removal, replacement, or installation, nor any logistics costs associated with repair or replacement.
- If the issue is outside warranty scope but the customer still requests STARTEK to repair, repair, materials, installation, and logistics costs will be charged.
- If STARTEK no longer sells the product, a suitable substitute will be offered. Price differences must be paid by the customer.
- Warranty service is limited to operations within Taiwan. The warranty period of any replacement product is calculated from the original purchase date. STARTEK reserves the right to decide on replacement and product type.
- STARTEK reserves the right to amend these warranty terms.
不在保固範圍內的情況
Out-of-Warranty Conditions
- 產品保固不適用於自行改變安裝方式、配線方式、配電方式、與更改結構。
- 產品保固不適用操作不當與使用不當清潔方式或用品所導致之瑕疵。
- 產品保固不適用於正常性損耗、切割或刮傷、撞擊或意外所造成的損壞。
- 產品放置於室外、高溫、高潮濕、高鹽分的環境(例如:汽車內、浴室淋浴區內側、海邊、溫泉區等),除特殊條件外,不適用於本產品保固。
- 產品保固不適用於自行拆除、裁切、搬移或修補產品而造成的毀損。
- 產品保固不適用於天災或意外事件所造成的毀損。
- 展示品及特價品所購買的產品不在保固範圍內。
- 品質保證只涵蓋原始購買人,權益不得轉讓。
- Warranty does not apply to self-modifications to installation, wiring, power supply, or structure.
- Warranty does not apply to defects caused by improper operation or improper cleaning methods/materials.
- Warranty does not apply to normal wear, cutting, scratching, impact, or accidental damage.
- Warranty does not apply to products placed in outdoor, high-temperature, high-humidity, or high-salinity environments (e.g. car interiors, the inside of shower areas, seaside, hot-spring areas) except where special terms apply.
- Warranty does not apply to damage caused by self-disassembly, cutting, moving, or repair.
- Warranty does not apply to damage from natural disasters or accidents.
- Display samples and discounted products are not covered.
- The warranty covers only the original purchaser and is non-transferable.
注意事項
Notes
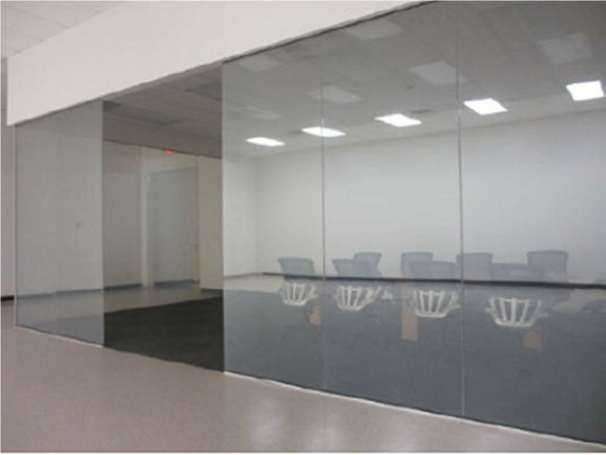
燈光建議
Lighting Recommendations
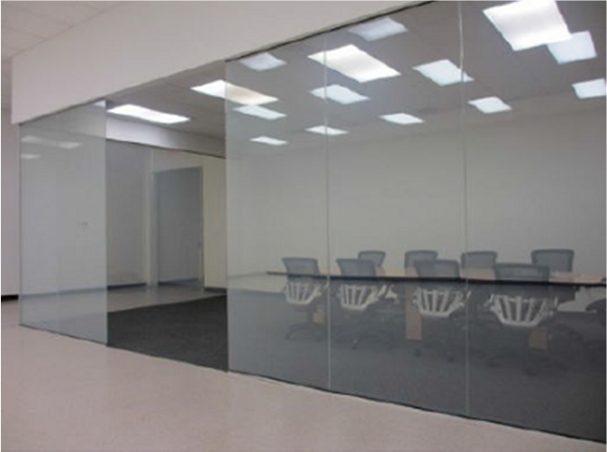
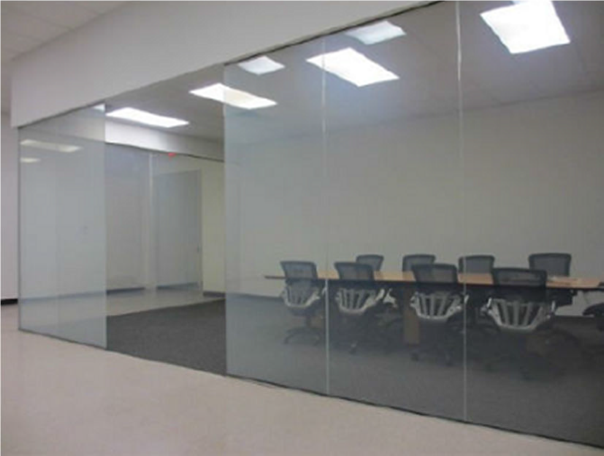
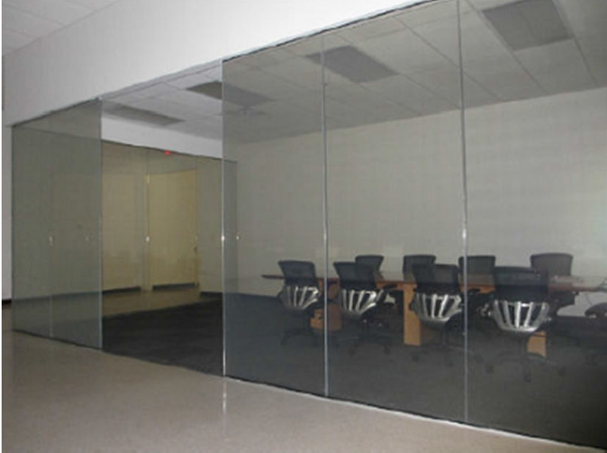
會議室照明配置會直接影響電控玻璃的霧狀觀感,注意外部光線在玻璃中的反射。以下列出最佳到最差的四種照明條件:
Conference-room lighting directly affects the perceived haze of smart glass; pay attention to how external light reflects off the glass. The four lighting conditions, from best to worst:
| 條件 | 說明 | 霧狀程度 |
|---|---|---|
| 最差 | 僅在會議室外部的光線會導致光強不平衡 | 霧狀明顯增加 |
| 較佳 | 會議室外部的光線強度比裡面的高 | 輕微霧狀 |
| 最佳 | 會議室裡面和外部的光線強度均勻平衡,並在適當的距離充分漫射 | 最佳通透 |
| 暗室 | 黑暗狀態下(所有光線「關閉」) | 較小霧狀 |
| Condition | Description | Haze |
|---|---|---|
| Worst | Light only outside the room — unbalanced light intensity | Haze significantly increased |
| Better | Outside light brighter than inside | Slight haze |
| Best | Inside and outside evenly balanced and well-diffused at appropriate distance | Best clarity |
| Dark Room | All lights off | Low haze |
服務流程與交期
Service Flow & Lead Time
電控玻璃案件從諮詢、施工到驗收,共 9 個階段。以下標示各階段的工作內容、職責分工,以及 STARTEK 兩項交期承諾 —
A smart-glass project runs through 9 stages — from inquiry to acceptance. The cards below outline the work, the responsibility split, and STARTEK's two key timing commitments —
透過 LINE 官方帳號聯繫;提供基本聯絡資料、案場資訊、平面圖/立面圖、期望安裝時間。
STARTEK 工程師到場確認案場條件、量測現場、了解需求;若案場條件特殊,會建議可執行的施工方案。
客戶將取得:(1) 正式報價單;(2)《施工介面說明書》— 詳列溝槽尺寸、預留電源位置、二次線走法,作為現場木工/水電施工依據。
訂單回簽、支付 70% 訂金、提供統編抬頭,STARTEK 開立訂金電子發票。
案場木工、水電依《施工介面說明書》施作(開溝槽、放線、預留電源),完成後拍照回傳 STARTEK 確認介面條件無誤。
STARTEK 安裝工程師再次到場,確認最終完成面尺寸、收邊細節、五金品項。
▶ 4 週交期倒數從這裡開始玻璃進料、加工、貼膜、品檢、出貨。
STARTEK 安裝團隊進場;多片或含特殊工法另計工期。
單組/單片 0.5–1 天完工驗收單確認 → 5 天內支付尾款 → 開立尾款發票 → 提供保固證明及維護保養說明書(明基系列另附原廠保固卡)。
Reach us via the LINE Official Account. Share basic contact info, site details, floor / elevation plans, and your target installation date.
A STARTEK engineer visits to verify site conditions, take measurements, and understand your needs. For unusual sites, we recommend a feasible installation approach.
Customer receives: (1) a formal quotation; (2) an Installation Interface Spec Sheet — detailing groove dimensions, power-outlet positions, and secondary wiring routes, as the working reference for on-site carpenters / electricians.
Sign the order, pay the 70% deposit, and provide your billing details. STARTEK issues the deposit e-invoice.
On-site carpenters and electricians carry out work per the Spec Sheet (grooves, wiring, power reserves). Photos are sent to STARTEK for interface confirmation when complete.
A STARTEK installer returns to confirm final finished-face dimensions, edge details, and hardware items.
▶ 4-week lead time starts hereGlass intake, processing, film lamination, QC, and shipment.
STARTEK installation team on site. Multi-panel jobs or installations requiring special methods are quoted separately for lead time.
Approx. 0.5–1 day per panel/groupAcceptance sheet signed → final payment within 5 days → final e-invoice issued → warranty certificate and care & maintenance guide provided (BenQ series includes the original manufacturer's warranty card).
STARTEK 產品系列總覽
STARTEK Product Collection
STARTEK 提供完整 PDLC 產品線,依色溫、應用場景、是否需通電分類。設計師選擇時主要看兩項指標:色溫(CCT)與光學解析度(透明狀態下的清晰度)。低色溫偏暖、高色溫偏冷白;沒有單一最佳解,依場景搭配。
STARTEK offers a full PDLC product line, classified by colour temperature, application, and whether power is required. Designers should primarily evaluate two metrics: colour temperature (CCT) and optical resolution (clarity in the transparent state). Lower CCT is warmer; higher CCT is cooler. There is no single "best" — match to the scenario.
室內系列(需通電)
Indoor Series (requires power)
暖色入門款
- 厚度 0.4 mm|視角 145°
- 最大尺寸 4,500 × 2,000 mm(特大)
- 驅動電壓 65 VAC
- T/T > 88% (On) / > 50% (Off)
- Haze 6% (On) / 90% (Off)
溫潤自然
- 厚度 0.38 mm|視角 160°
- 最大尺寸 1,500 × 3,600 mm
- 驅動電壓 48 VAC
- T/T > 88% (On) / > 80% (Off)
- Haze < 5% (On) / > 95% (Off)
- UV > 55%|IR > 30%|SHGC 0.84/0.67
白淨無色差
- 厚度 0.27 mm|視角 160°
- 最大尺寸 1,500 × 3,600 mm
- 驅動電壓 48 VAC
- T/T > 86% (On) / > 74% (Off)
- Haze < 4.5% (On) / > 96% (Off)
- UV 43%/29%|IR 22%/29%|SHGC 0.84/0.75
高端透明
- 厚度 0.27 mm|視角 160°
- 最大尺寸 1,500 × 3,600 mm
- 驅動電壓 48 VAC
- T/T > 87% (On) / > 73% (Off)
- Haze < 3% (On) / < 96% (Off)
- UV 43%/29%|IR 22%/29%|SHGC 0.84/0.75
Warm Entry
- Thickness 0.4 mm | Viewing angle 145°
- Max size 4,500 × 2,000 mm (extra-large)
- Drive voltage 65 VAC
- T/T > 88% (On) / > 50% (Off)
- Haze 6% (On) / 90% (Off)
Warm Natural
- Thickness 0.38 mm | Viewing angle 160°
- Max size 1,500 × 3,600 mm
- Drive voltage 48 VAC
- T/T > 88% (On) / > 80% (Off)
- Haze < 5% (On) / > 95% (Off)
- UV > 55% | IR > 30% | SHGC 0.84/0.67
Crisp White
- Thickness 0.27 mm | Viewing angle 160°
- Max size 1,500 × 3,600 mm
- Drive voltage 48 VAC
- T/T > 86% (On) / > 74% (Off)
- Haze < 4.5% (On) / > 96% (Off)
- UV 43%/29% | IR 22%/29% | SHGC 0.84/0.75
Premium Clear
- Thickness 0.27 mm | Viewing angle 160°
- Max size 1,500 × 3,600 mm
- Drive voltage 48 VAC
- T/T > 87% (On) / > 73% (Off)
- Haze < 3% (On) / < 96% (Off)
- UV 43%/29% | IR 22%/29% | SHGC 0.84/0.75
室內深色系列
Indoor Dark Series
Deep Grey 深灰
- 厚度 0.43 mm
- T/T > 34% (On)
- Haze < 4% (On)
- SHGC 0.36 (Off)
- 驅動電壓 48 VAC
Piano Black 鋼琴黑
- 厚度 0.55 mm
- T/T > 21% (On)
- Haze < 7% (On)
- SHGC 0.49 (Off)
- 驅動電壓 48 VAC
Deep Grey
- Thickness 0.43 mm
- T/T > 34% (On)
- Haze < 4% (On)
- SHGC 0.36 (Off)
- Drive voltage 48 VAC
Piano Black
- Thickness 0.55 mm
- T/T > 21% (On)
- Haze < 7% (On)
- SHGC 0.49 (Off)
- Drive voltage 48 VAC
特殊產品 — STARTEK PrivacyShield™
Special Product — STARTEK PrivacyShield™
透過專利光學技術,外部仍可清楚辨識室內是否有人使用,但同時可有效遮蔽螢幕、簡報與會議內容。不需通電即達成 — 為企業打造更安心的會議環境。
Through proprietary optical technology, outsiders can still clearly tell whether the room is in use, while screen content, slides, and meeting details remain effectively concealed. Achieved without any electricity — providing a more secure meeting environment.
| 厚度 | 0.195 mm(最薄) |
|---|---|
| 運作模式 | Transparent · No electricity required(不需通電) |
| 最大尺寸 | 1,430 × 3,000 mm |
| 可見光穿透率 | > 25% |
| 霧度 | < 5% |
| Blocking Angle | 160° |
| UV-cut (380 nm) | < 1% |
| 工作溫度 | -10 ~ 60°C |
| Thickness | 0.195 mm (thinnest) |
|---|---|
| Operating Mode | Transparent · No electricity required |
| Max Size | 1,430 × 3,000 mm |
| Visible Light Transmittance | > 25% |
| Haze | < 5% |
| Blocking Angle | 160° |
| UV-cut (380 nm) | < 1% |
| Operating Temperature | −10 to 60°C |
最佳應用:企業會議室、會議預約牆、醫療診間、法律事務所會談室。
Best applications: corporate meeting rooms, booking-status walls, medical consult rooms, law-firm meeting rooms.
整體規格對照表
Full Spec Comparison
| 項目 | 1-2800K | 2-3000K | 2-4800K | 3-5000K | 3-EX30 | 3-EX20 |
|---|---|---|---|---|---|---|
| 色調 | White | White | White | White | Deep Grey | Piano Black |
| 厚度 mm | 0.4 | 0.38 | 0.5±0.02 | 0.42 | 0.43 | 0.55 |
| T/T (ON) | > 87% | > 88% | > 87% | > 87% | > 34% | > 21% |
| Haze (ON) | 5% | < 5% | < 4.5% | < 3% | < 4% | < 7% |
| 視角 | 145° | 160° | 160° | 160° | 160° | 160° |
| 驅動電壓 | 48 ~ 75 VAC | 48 VAC | 48 VAC | |||
| SHGC (OFF) | 0.67 | 0.36 | 0.49 | |||
| Item | 1-2800K | 2-3000K | 2-4800K | 3-5000K | 3-EX30 | 3-EX20 |
|---|---|---|---|---|---|---|
| Tone | White | White | White | White | Deep Grey | Piano Black |
| Thickness (mm) | 0.4 | 0.38 | 0.5±0.02 | 0.42 | 0.43 | 0.55 |
| T/T (ON) | > 87% | > 88% | > 87% | > 87% | > 34% | > 21% |
| Haze (ON) | 5% | < 5% | < 4.5% | < 3% | < 4% | < 7% |
| Viewing Angle | 145° | 160° | 160° | 160° | 160° | 160° |
| Drive Voltage | 48–75 VAC | 48 VAC | 48 VAC | |||
| SHGC (OFF) | 0.67 | 0.36 | 0.49 | |||
共通規格:耗電 5–10 W/m²;工作溫度 -10 ~ +60°C;儲存溫度 -20 ~ +65°C;反應時間 Off→On < 10 ms / On→Off < 200 ms。
Common specs: Power 5–10 W/m²; Operating −10 to +60°C; Storage −20 to +65°C; Response time Off→On < 10 ms / On→Off < 200 ms.
Startek R — 反向 PDLC
Startek R — Reverse PDLC
與一般 PDLC 的工作邏輯對照
Operation Mode vs. Standard PDLC
| 狀態 | 一般 PDLC(Startek 1 / 2 / 3 / EX 等) | Startek R(反向 PDLC) |
|---|---|---|
| 通電 ON | 透明 | 霧化(不透明) |
| 斷電 OFF | 霧化(不透明) | 透明(fail-safe) |
| 預設狀態 | 霧化(隱私) | 透明(開放) |
| 停電情境 | 卡在霧化、擋視線 | 自動變透明、不擋視線 |
| 節能邏輯 | 需要透明時通電 | 需要遮蔽時通電 |
| State | Standard PDLC (Startek 1 / 2 / 3 / EX) | Startek R (Reverse PDLC) |
|---|---|---|
| Power ON | Transparent | Opaque (frosted) |
| Power OFF | Opaque (frosted) | Transparent (fail-safe) |
| Default | Opaque (privacy) | Transparent (open) |
| Power outage | Stuck opaque — blocks sightline | Auto-clears — sightline preserved |
| Energy logic | Power on for transparency | Power on for privacy |
適用場域
Use Cases
- 緊急逃生路徑、消防動線:停電時走道、樓梯間自動變透明,不擋視線,符合公共安全需求。
- 大部分時間維持透明的公共空間:商辦會議室、Showroom、住家臥房對外牆 — 預設透明、僅在需要遮蔽時通電,反過來節能。
- 醫療、實驗室、無塵室:對隱私敏感但對「斷電卡死」更敏感的場域,故障與停電時自動回到可視狀態。
- Emergency egress routes & fire escape paths: corridors and stairwells become transparent during a power outage, preserving sightlines and meeting public-safety requirements.
- Public spaces that stay transparent most of the time: corporate meeting rooms, showrooms, bedroom-to-balcony walls — default transparent, only powered when privacy is needed. Energy use is inverted.
- Healthcare, labs, cleanrooms: privacy-sensitive but even more sensitive to "stuck opaque" failures. Faults and outages auto-revert to a visible state.
技術規格
Technical Specifications
| 項目 | 規格 |
|---|---|
| 工作電壓 | AC 65 ± 5V(與一般 PDLC 相容,共用變壓器) |
| 耗電 | 約 3.7 W/m² |
| 頻率 | 50–60 Hz |
| 切換時間 | < 1 秒(OFF→ON 約 200ms、ON→OFF 約 600ms) |
| 透光率(斷電 = 透明態) | 85% |
| 霧度(通電 = 霧化態) | 5 ± 0.5% |
| 視角 | 約 165° |
| UV 阻擋 | > 99%(通電 / 斷電皆然) |
| IR 阻擋 | 17%(通電)/ 80%(斷電) |
| 工作溫度 | −20°C ~ +60°C |
| 使用壽命 | > 100,000 小時(約 20 年) |
| 幅寬 | 1.2m / 1.5m(整捲 20m) |
| 厚度 | 0.26mm(直貼) / 12mm(膠合,含兩片 5mm 玻璃) |
| 保固 | 兩年 |
| Item | Specification |
|---|---|
| Working Voltage | AC 65 ± 5V (compatible with standard PDLC, shares the same transformer) |
| Power Consumption | ~3.7 W/m² |
| Frequency | 50–60 Hz |
| Switching Time | < 1 sec (OFF→ON ~200 ms; ON→OFF ~600 ms) |
| Transmittance (Power OFF = clear) | 85% |
| Haze (Power ON = opaque) | 5 ± 0.5% |
| Viewing Angle | ~165° |
| UV Block | > 99% (both ON and OFF) |
| IR Block | 17% (ON) / 80% (OFF) |
| Operating Temp. | −20°C to +60°C |
| Lifetime | > 100,000 hrs (~20 years) |
| Roll Width | 1.2m / 1.5m (20m per roll) |
| Thickness | 0.26mm (adhesive film) / 12mm (laminated, with two 5mm glass panes) |
| Warranty | 2 years |
施工注意事項(與一般 PDLC 的關鍵差異)
Installation Precautions (Key Differences vs. Standard PDLC)
① 邊角防護
① Edge Protection
避免任何剪切力、撞擊、拗折作用在膜的邊緣或邊角,否則會造成 PET 兩層分離(脫層)。搬運時用整片支撐、不可只抓邊角。
Avoid any shear, impact, or folding force on the edges or corners — these cause the two PET layers to separate (delaminate). When moving the film, support the full sheet; never grip by the corner alone.
② 開箱與攤平
② Unpacking & Placement
必須在無凸起物、潔淨、平整的工作面上展開捲料。地面如有顆粒、釘頭、毛邊,膜面會被壓出永久性凹痕。
Unroll the film on a flat, clean surface free of protrusions. Any grit, nail head, or burr on the floor will press a permanent dent into the film.
③ 撕除藍色運輸保護膜
③ Removing the Blue Transport Protection Film
- 從膜的邊緣定位起撕,不可從角落起撕。
- 撕除角度盡量接近 180°(即沿膜面反折),以最小化應力。
- 撕除過程保持速度均勻,不可猛拉。
- Start at the film's edge, never at a corner.
- Pull at as close to 180° as possible (i.e. folded back along the film surface) to minimize stress.
- Keep peel speed even — no sudden jerks.
④ 撕除黏面保護膜(離型紙)
④ Removing the Adhesive-Side Release Liner
- 只能從非黏面電極側(busbar 那一側)起撕。
- 嚴禁從角落起撕(會造成應力集中、分層)。
- 已撕下的保護膜不可重貼回去—— 重貼會造成應力不均,影響後續貼附品質。
- Start only from the non-adhesive electrode side (the busbar edge).
- Do not start from a corner — that concentrates stress and causes delamination.
- A liner once removed must never be reapplied — it creates uneven stress and degrades subsequent bonding.
⑤ 撕除非黏面保護膜
⑤ Removing the Non-Adhesive Outer Film
- 必須安裝完成後才從電極側撕除。
- 同樣不可從角落起撕,必須從匯流排(busbar)區起撕。
- 已撕下不可重貼。
- Remove only after installation is complete, starting at the electrode side.
- Same rule — never from a corner; start at the busbar.
- Once removed, do not reapply.
Busbar 電極配置
Busbar Configuration
Startek R 依玻璃高度(H)採用以下三種 busbar 配置 — 圖中黃/藍長條即電極位置(黃=正、藍=負)。Model B(頂底各一條整條 busbar)不適用於 Startek R;完整 4 型對照表與一般 PDLC、EP 的適用區間,請見 §07 Busbar Model 對照表。
Startek R uses one of the following three busbar configurations depending on panel height (H). Yellow / blue strips represent electrode positions (yellow = +, blue = −). Model B (single full-width busbar on top & bottom) does not apply to Startek R — see §07 Busbar Model for the full four-type table and PDLC / EP ranges.
Model A · 頂端兩段(分極)Top edge (split)
H < 1.5m
H < 1.5m
Model D · 頂底兩端(各自分極)Top & bottom (each split)
1.5m ≤ H < 3m(或 H < 1.5m 但 H/W ≥ 7)
1.5m ≤ H < 3m (or H < 1.5m with H/W ≥ 7)
Model C · 單側邊(上下分極)One side edge (split)
H ≥ 3m(或 H ≤ 3m 但 H/W ≥ 7)
H ≥ 3m (or H ≤ 3m with H/W ≥ 7)
- ITO 方阻:清潔絕緣層後 < 300 Ω(最佳 150–220 Ω)— Startek R 因 ITO 上方多一層絕緣層,需以無水酒精濕潤的無塵紙稍施力擦淨。
- ITO sheet resistance: < 300 Ω after cleaning the insulating layer (150–220 Ω ideal). Startek R has an extra insulating layer above the ITO; clean with dust-free paper moistened with anhydrous ethanol, applying gentle pressure.
驗收與保固注意
Acceptance & Warranty Notes
- 「斷電變透明」非故障:驗收時若客戶誤判「按開關沒反應、玻璃透明」為故障,應先確認是否處於「未通電」狀態 — Startek R 的設計即是斷電透明。
- 變壓器與遙控器共用:與一般 PDLC 共用變壓器規格與遙控器邏輯,場勘變壓器盤點時依現有 §08 章節執行。
- 邊緣處理:膠合版(Lam)的邊緣矽利康封邊強度,需比照 EX 系列規格處理,避免因 PET 應力釋放造成邊緣局部脫層。
- "Transparent when off" is not a fault: if a client interprets "switch does nothing, glass is clear" as a defect during acceptance, first confirm whether the panel is unpowered — Startek R is intentionally clear at rest.
- Shared transformer & remote: Startek R uses the same transformer spec and remote control logic as standard PDLC. Site-survey transformer counts follow §08 as-is.
- Edge treatment: laminated Startek R edges should be sealed with silicone at the same strength as the EX series, to absorb PET stress release and prevent localized edge delamination.
第三方檢測認證
Third-Party Test Data
STARTEK 電控玻璃整套系統(玻璃 + 膜 + 電源)皆有國家級第三方驗證 — 設計師可在規格書中直接引用以下數據。
The STARTEK smart-glass system (glass + film + power supply) has full national-level third-party certification. Designers may cite the following data directly in their specification documents.
穩定性檢測(最具代表性)
Stability Testing (Most Representative)
| 使用情境 | 日均開關次數 | 可對應使用年限 |
|---|---|---|
| 住家 | 10 次/日 | 約 21.9 年 |
| 商辦/會議室 | 20 次/日 | 約 11 年 |
| Use Case | Daily Switching | Equivalent Service Life |
|---|---|---|
| Residential | 10×/day | ≈ 21.9 years |
| Office / Meeting Room | 20×/day | ≈ 11 years |
註:依 GB/T 35847-2018 標準測試 80,000 次切換為國家標準規範要求,STARTEK 實測結果(0.29% vs. 容許 3%)遠優於國家標準。
Note: 80,000-cycle testing is the requirement of GB/T 35847-2018. STARTEK's measured result (0.29% vs. allowed 3%) far exceeds the national standard.
電源 AWS100 認證(48V / 2.1A / 100W)
AWS100 Power-Supply Certifications (48V / 2.1A / 100W)
| 檢測類別 | 標準/規範 | 發證單位 |
|---|---|---|
| RoHS 有害物質 | 歐盟 RoHS 2011/65/EU + 2015/863 無鉛、鎘、汞、六價鉻等有害物質 | 華測 CTI(Centre Testing International) |
| BSMI 電磁相容 | CNS 13438 乙類(家用環境) | 耕興股份有限公司 |
| NCC 型式認證 | 低功率射頻器材審驗規則 | NCC 授權耕興檢測 |
| Test Category | Standard / Specification | Issuing Body |
|---|---|---|
| RoHS — Hazardous Substances | EU RoHS 2011/65/EU + 2015/863 Lead, cadmium, mercury, hexavalent chromium, etc. | CTI (Centre Testing International) |
| BSMI — Electromagnetic Compatibility | CNS 13438 Class B (residential environment) | Sporton International Inc. |
| NCC Type Approval | Low-power RF equipment regulations (Taiwan) | NCC-authorised testing by Sporton |
車用調光膜(補充應用)
Automotive PDLC (Supplementary)
法規合規 — VLT 70%
Regulatory Compliance — VLT 70%
日本車檢強制要求:前擋風玻璃及前側窗玻璃施工後,可視光透過率(VLT)必須維持在 70% 以上。施工前務必確認膜材規格符合法規。台灣交通法規請洽當地監理單位。
Japanese vehicle inspection requires that, after installation, the front windscreen and front-side windows must maintain Visible Light Transmittance (VLT) of 70% or higher. Confirm that the film meets this regulation before installing. For Taiwan, consult the local DMV.
與建築施工的關鍵差異
Key Differences from Architectural Installation
| 項目 | 建築用 | 車用 |
|---|---|---|
| 電源 | 市電 AC 110/220V | 12V/24V DC 轉 AC(需專用逆變器) |
| 玻璃弧度 | 平面為主 | 複雜三維曲面(須對膜層先「熱縮」處理) |
| 震動環境 | 低 | 高(行駛震動) |
| 邊緣密封 | 標準矽利康 | 加強型抗震固定(防剝離) |
| 法規重點 | 建築 / 消防法規 | VLT 透光率車檢規範 |
| Item | Architectural | Automotive |
|---|---|---|
| Power | Mains AC 110/220V | 12V/24V DC → AC (dedicated inverter required) |
| Glass Curvature | Primarily flat | Complex 3D curves (film must be heat-shrunk first) |
| Vibration | Low | High (driving vibration) |
| Edge Seal | Standard silicone | Vibration-reinforced fixing (prevents delamination) |
| Regulatory Focus | Building / fire codes | VLT and vehicle-inspection standards |
施工要點摘要
Installation Key Points
- 三維熱成型:乾式施工前需對膜層進行精確熱縮處理,使曲率與玻璃完全吻合。
- 低電壓驅動:車用系統採 12V/24V DC 轉高頻交流電,需安裝專用逆變器並對接線處進行抗震防護。
- 邊緣應力防護:汽車玻璃會頻繁升降(車窗),邊緣的膠帶固定與密封強度需優於建築規格,防止因振動導致剝離。
- 3D heat forming: Before dry installation, the film must be precisely heat-shrunk to match the curvature of the glass exactly.
- Low-voltage drive: Automotive systems use 12V/24V DC converted to high-frequency AC. A dedicated inverter is required, and connection points must be vibration-protected.
- Edge stress protection: Car windows are raised and lowered frequently. Edge tape fixing and seal strength must exceed architectural specs to prevent vibration-induced delamination.
合作夥伴產品 · Clestra Hauserman
Partner Spotlight · Clestra Hauserman
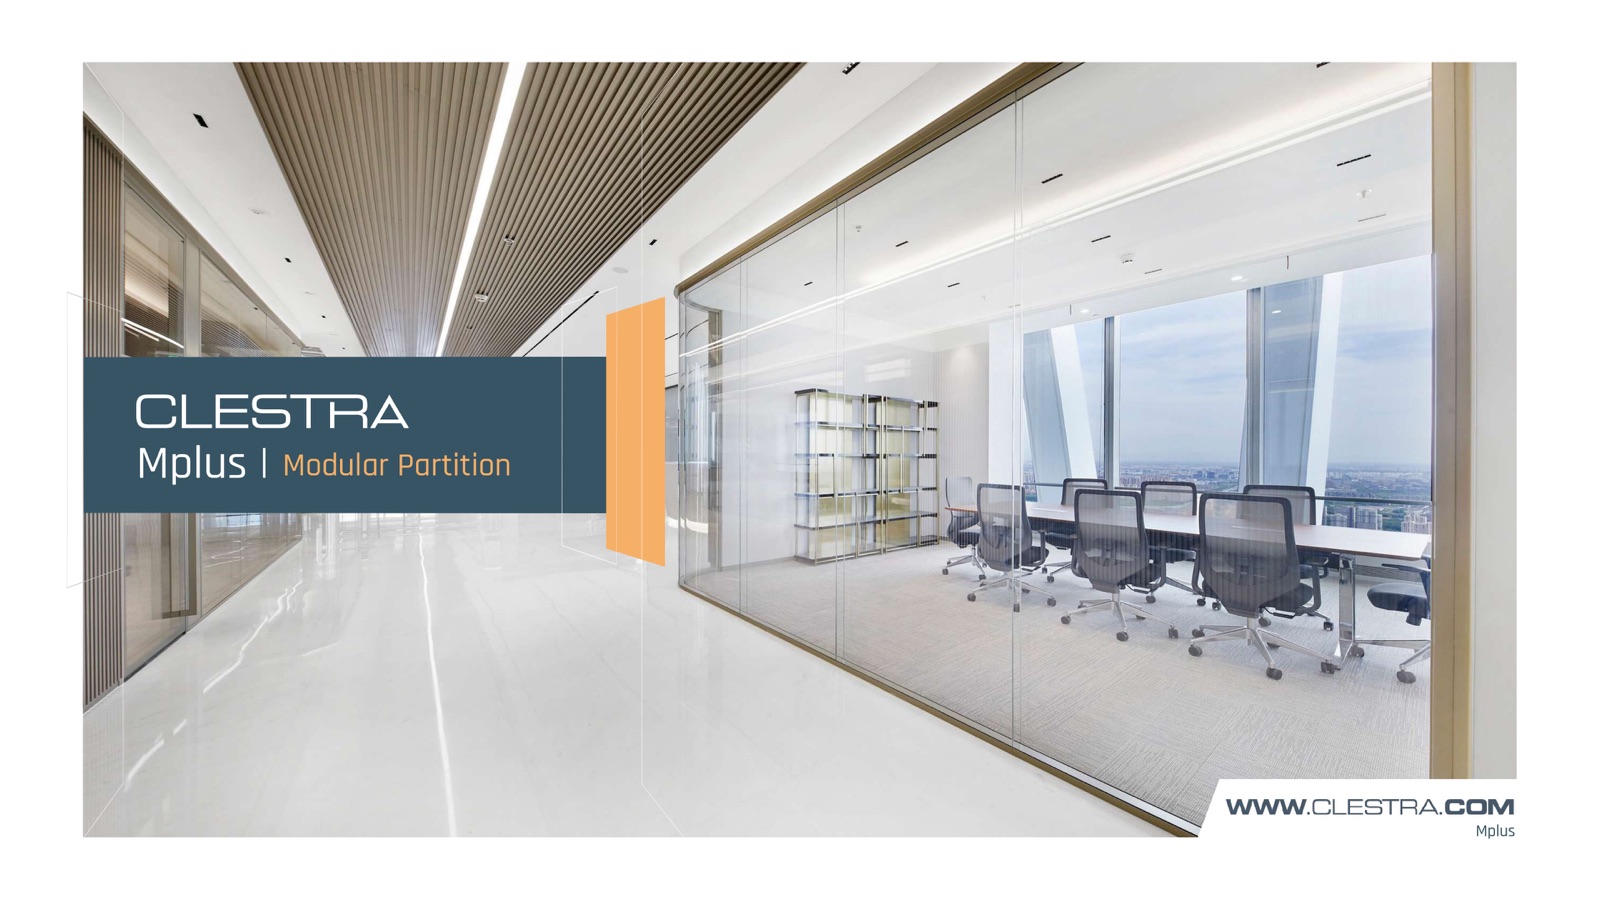
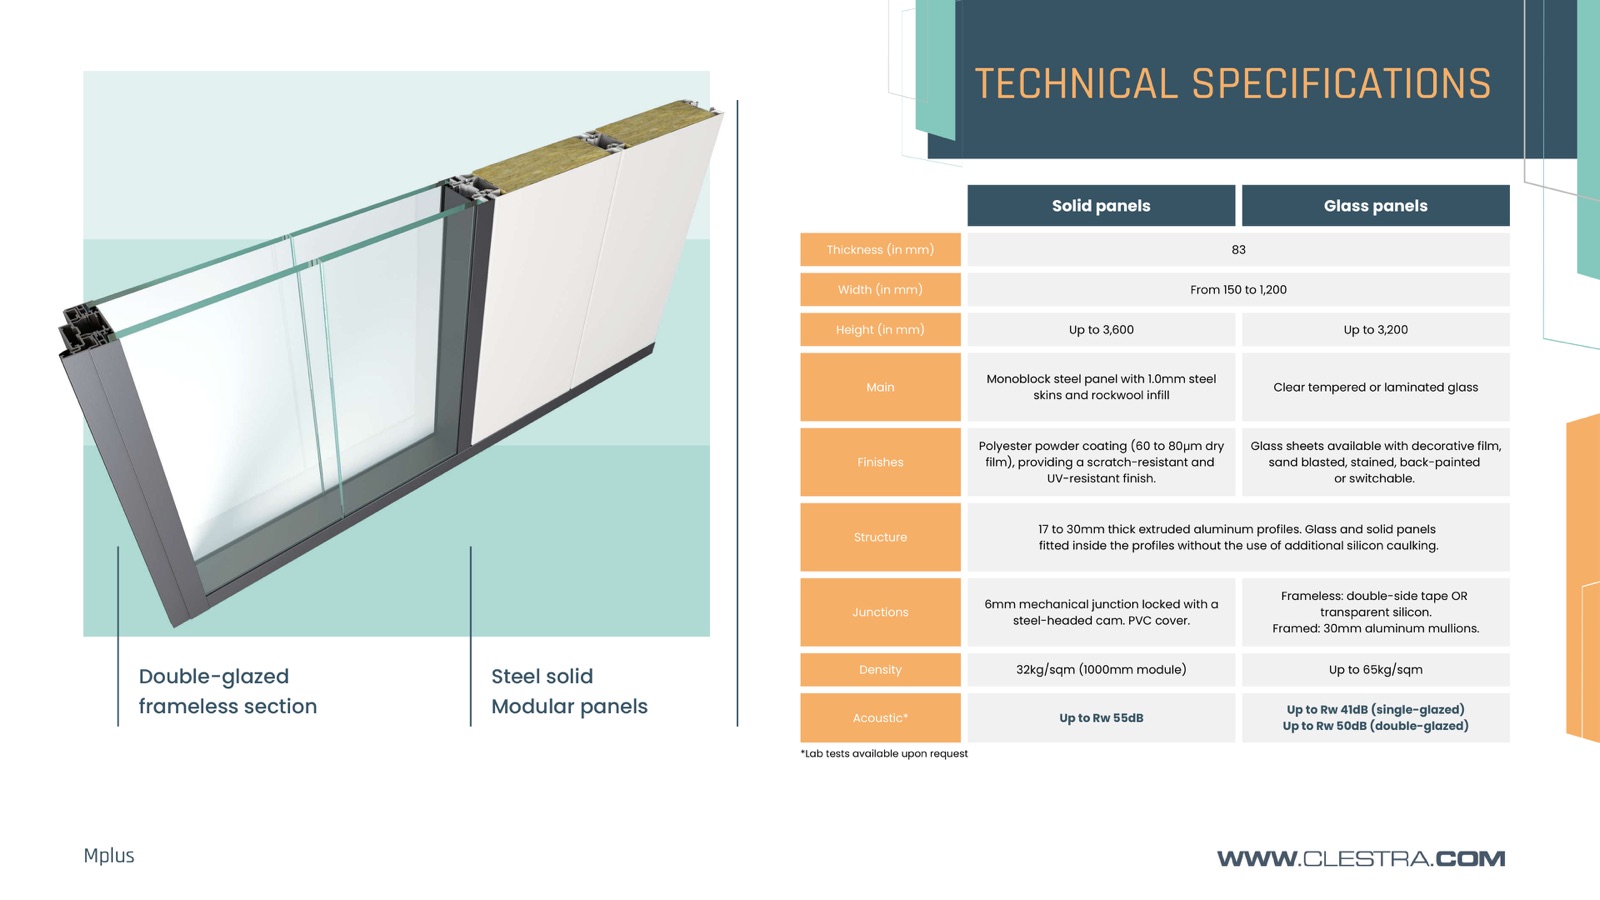
Mplus|核心規格一覽
Mplus|Key Specifications
| 項目 | 實心面板 Solid Panel | 玻璃面板 Glass Panel |
|---|---|---|
| 厚度 | 83 mm(1.0 mm 鋼板 + 岩棉填充) | 8 / 10 / 12 mm 強化或膠合玻璃 |
| 寬度 | 150 – 1,200 mm | 同左 |
| 最高高度 | 3,600 mm | 3,200 mm |
| 密度 | 32 kg/m²(1000mm 模組) | 最高 65 kg/m² |
| 隔音 Rw | 最高 55 dB | 單層 41 dB|雙層 50 dB |
| 表面處理 | polyester 烤漆 60–80μm(抗刮 / 抗 UV) | 裝飾貼膜 / 噴砂 / 染色 / 背漆 / switchable(電控調光) |
| 接合方式 | 6 mm 機械鎖扣 + PVC 蓋條 | 無框:雙面膠或透明矽膠|有框:30 mm 鋁立柱 |
| 鋁擠型結構 | 17 – 30 mm extruded aluminum profile(玻璃與實心面板共用) | |
| Item | Solid Panel | Glass Panel |
|---|---|---|
| Thickness | 83 mm (1.0 mm steel skin + rockwool infill) | 8 / 10 / 12 mm tempered or laminated |
| Width | 150 – 1,200 mm | Same |
| Max Height | 3,600 mm | 3,200 mm |
| Density | 32 kg/m² (1000 mm module) | Up to 65 kg/m² |
| Acoustic Rw | Up to 55 dB | Single-glazed 41 dB|Double-glazed 50 dB |
| Finish | Polyester powder coating 60–80μm (scratch / UV resistant) | Decorative film / sand blast / stained / back-painted / switchable |
| Junction | 6 mm mechanical lock + PVC cover | Frameless: double-side tape or transparent silicone|Framed: 30 mm aluminum mullion |
| Aluminum Profile | 17 – 30 mm extruded aluminum profile (shared for glass and solid) | |
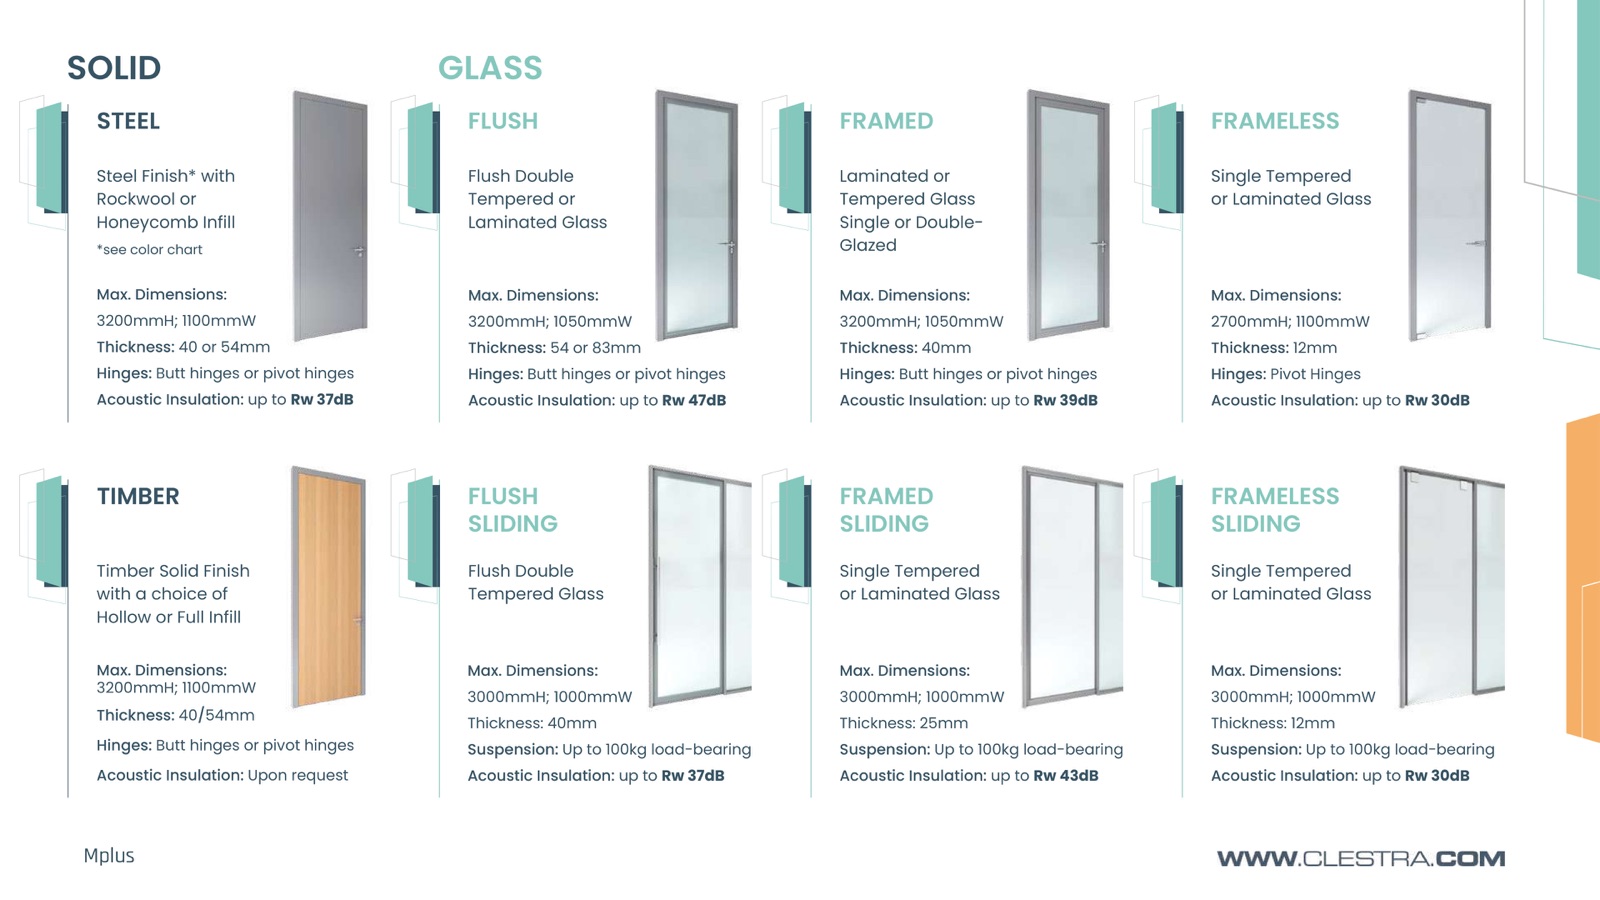
門選項(共 8 種,4 種重點)
Door Options (8 total, 4 key types)
| 類型 | 子型 | 最大尺寸(H × W) | 最高隔音 Rw |
|---|---|---|---|
| 實心 Solid | Steel(鋼骨 + 岩棉 / 蜂巢) | 3200 × 1100 mm | 37 dB |
| Timber(木質實心) | 3200 × 1100 mm | 客製化 | |
| 玻璃 Glass(旋開) | Flush 齊平雙層 | 3200 × 1050 mm | 47 dB |
| Framed 有框 | 3200 × 1050 mm | 39 dB | |
| Frameless 無框 | 2700 × 1100 mm | 30 dB | |
| 玻璃 Glass(橫拉,吊軌承重最高 100kg) | Flush sliding | 3000 × 1000 mm | 37 dB |
| Framed sliding | 3000 × 1000 mm | 43 dB | |
| Frameless sliding | 3000 × 1000 mm | 30 dB |
| Type | Sub-type | Max Size (H × W) | Max Rw |
|---|---|---|---|
| Solid | Steel (frame + rockwool / honeycomb) | 3200 × 1100 mm | 37 dB |
| Timber | 3200 × 1100 mm | On request | |
| Glass (swing) | Flush double-glazed | 3200 × 1050 mm | 47 dB |
| Framed | 3200 × 1050 mm | 39 dB | |
| Frameless | 2700 × 1100 mm | 30 dB | |
| Glass (sliding, suspension up to 100 kg) | Flush sliding | 3000 × 1000 mm | 37 dB |
| Framed sliding | 3000 × 1000 mm | 43 dB | |
| Frameless sliding | 3000 × 1000 mm | 30 dB |
產品線速覽(除 Mplus 之外)
Other Product Lines (beyond Mplus)
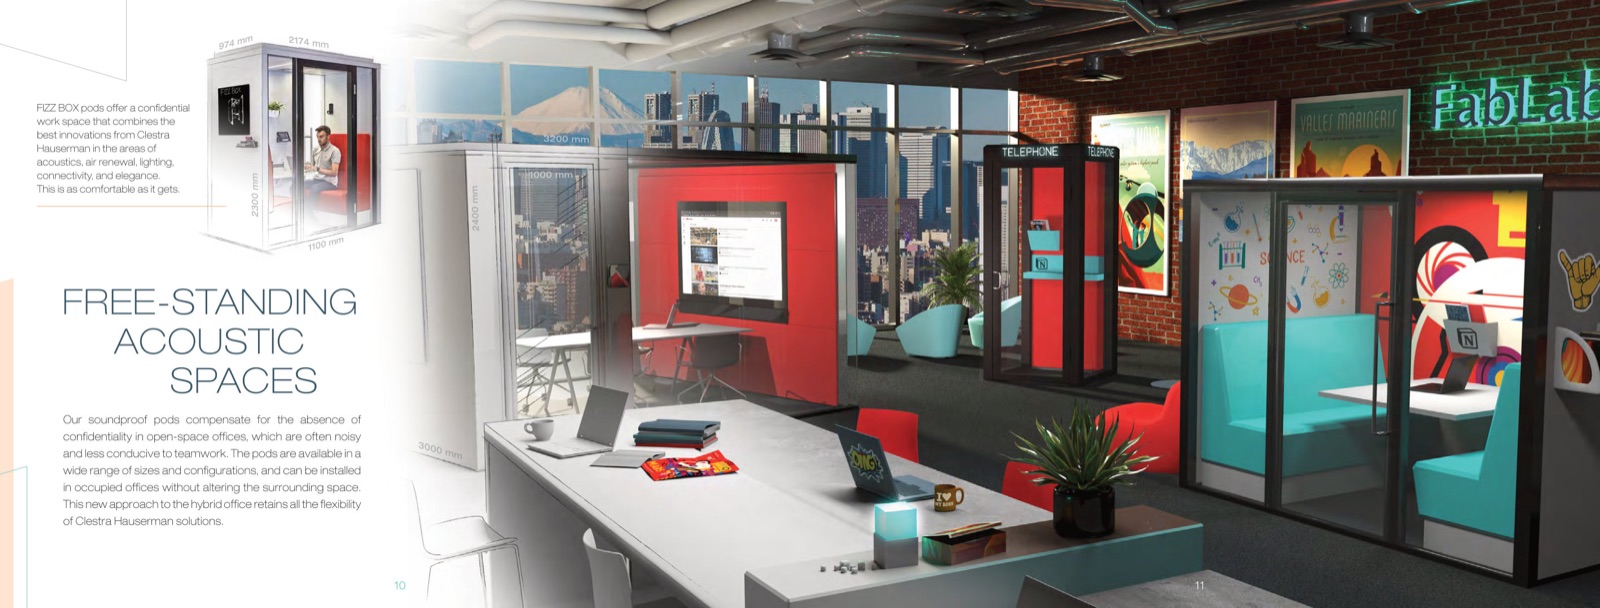
- FIZZ BOX — 自立式隔音艙(電話亭 / 會議艙),2300H × 2174W × 974D mm;可在已啟用辦公室現場安裝。
- Operable Wall — 半自動 / 全自動移動隔牆,吊軌固定於天花板;應用於飯店宴會廳、會議中心、彈性大空間。
- Clestra Cleanroom — 集團獨立事業部,近 40 年經驗,1000+ 無塵室案場;涵蓋 health / pharma / biotech / microelectronics / labs。
- FIZZ BOX — Free-standing acoustic pod (phone booth / meeting pod), 2300H × 2174W × 974D mm. Installable in occupied offices.
- Operable Wall — Semi- or fully-automatic movable partition with ceiling-mounted track. For hotel ballrooms, convention centres, flexible large spaces.
- Clestra Cleanroom — Standalone division with ~40 years' experience and 1,000+ cleanroom projects across health, pharma, biotech, microelectronics, labs.
2300H × 2174W × 974D mm。Image © Clestra Hauserman.

吊軌天花固定;ABCDEF 多種收納方式。Image © Clestra Hauserman.
2300H × 2174W × 974D mm. Image © Clestra Hauserman.
Ceiling-mounted track; six storage modes A–F. Image © Clestra Hauserman.
認證與環保訴求
Certifications & Sustainability
- 工廠:ISO 9001 / 14001 / 45001 / KOSHA-MS 認證;三廠分布於法國 Strasbourg、韓國 Gumi、中國太倉 Taicang
- 綠建築貢獻:LEED、HQE、BREEAM、WELL、BEAM+
- VOC / TVOC 排放:0.005 mg/m²·h(KS I ISO 1600-9: 2006)
- 防火:ISO 5660-1 半不燃
- 循環建築:模組化可拆裝、可重用、可重新配置(reusable / relocatable)
- Factories: ISO 9001 / 14001 / 45001 / KOSHA-MS certified; three plants in Strasbourg (France), Gumi (Korea), Taicang (China)
- Green building credits: LEED, HQE, BREEAM, WELL, BEAM+
- VOC / TVOC: 0.005 mg/m²·h (KS I ISO 1600-9: 2006)
- Fire: ISO 5660-1 semi non-combustible
- Circular construction: modular, demountable, reusable, relocatable

Clestra × STARTEK 搭配建議
Clestra × STARTEK Integration
- 有框玻璃(Framed)+ STARTEK PDLC — 最常見搭配;隔音 Rw 39 dB + 隨意切換的隱私模式。
- 雙層玻璃(Double-glazed)+ STARTEK PDLC 夾層 — 隔音 Rw 50 dB 不衰減;PDLC 膜夾在雙層中間,外觀完全不變。
- 移動隔牆(Operable Wall)+ STARTEK PDLC — 大空間需要彈性分隔時,配電控玻璃可實現「分隔即遮蔽、開啟即通透」。
- Framed glass + STARTEK PDLC — Most common combination; Rw 39 dB plus on-demand privacy.
- Double-glazed + STARTEK PDLC inter-layer — Maintains Rw 50 dB acoustic without compromise; PDLC sandwiched between the two panes, no visual change.
- Operable Wall + STARTEK PDLC — For large flexible spaces — "partitioned = opaque, opened = transparent" in one motion.
界面整合實拍(富邦 A25 高樓商辦案場)
Integration Detail (Live Project · Fubon A25 High-rise Office)
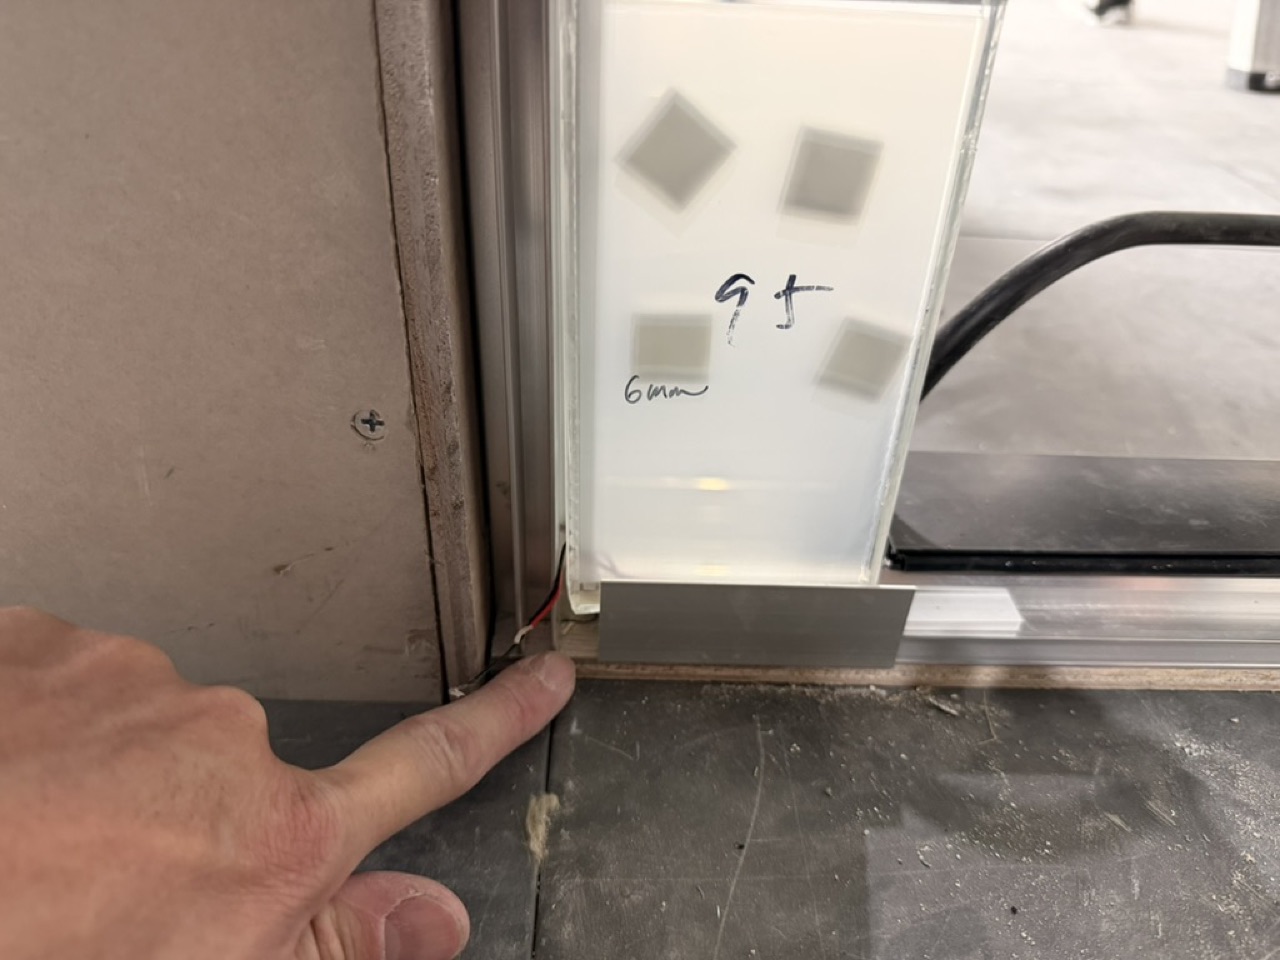
本影片展示 STARTEK 用專用工具拆解 Clestra Mplus 鋁框的步驟。Mplus 模組化設計讓鋁框可在不破壞玻璃面板的情況下整支拆下,因此電控玻璃(PDLC)膜層日後若需要檢修、更換變壓器、或重新對線,**不必整面隔間打掉重做**,只要把鋁框拆開即可作業 — 大幅降低長期維護成本與停工時間。11 秒;點擊播放。Video: STARTEK|富邦 A25 高樓商辦案場。
The video shows how STARTEK uses a dedicated tool to disassemble the Clestra Mplus aluminum profile. Because Mplus is modular, the profile can be removed without damaging the glass panel — so future PDLC film servicing, transformer replacement, or rewiring does not require demolishing the entire partition; just open the frame to work on it. This dramatically reduces long-term maintenance cost and downtime. 11s; tap to play. Video: STARTEK|Fubon A25 high-rise office project.
Email:sunday@sundayyu.com | 電話:+886 2 2883 2935 | 行動:+886 953 178 870
地址:台北市中山區八德路二段 245 號 10 樓 A
需要 Clestra Mplus + STARTEK 電控玻璃整合提案?聯繫 Sunday Partition 或直接洽 STARTEK 皆可。
Email:sunday@sundayyu.com | Tel:+886 2 2883 2935 | Mobile:+886 953 178 870
Address:10F-A, No. 245, Sec. 2, Bade Rd., Zhongshan Dist., Taipei City
For Clestra Mplus + STARTEK switchable glass proposals, contact Sunday Partition or STARTEK directly.
資料來源:Clestra 2024 Mplus Brochure v6、Clestra Company & Brand Profile 2021、Clestra 官網 clestra.com。本頁規格僅供設計階段參考,實際採購規格與報價請洽 Sunday Partition 或 Clestra 在地分公司。
Sources: Clestra 2024 Mplus Brochure v6, Clestra Company & Brand Profile 2021, clestra.com. Specifications shown are for design reference; for procurement specs and pricing, contact Sunday Partition or your local Clestra office.